Bézier Curve Tutorial
Updated: 2026-05*

This article was written before 2020. It is kept here as an archive — the content is outdated and some links may no longer work.
1. What Are Bézier Curves?
Bézier curves (Wikipedia) were devised by Pierre Bézier, then an engineer at the French automobile manufacturer Renault, as a method for drawing smooth curves on a computer for car body design. Even curves with complex irregularities can be represented using the coordinates of control points and mathematical functions.
(From https://en.wikipedia.org/wiki/Bézier_curve)
As shown in the figure below, a curve is drawn such that point P0 is a tangent point, the line segment connecting P0 and P1 is its tangent line, point P3 is a tangent point, and the line segment connecting P2 and P3 is its tangent line. This makes the concept easy to understand intuitively, and it is used in vector graphics applications such as Adobe Illustrator and Adobe Flash.

2. Pen Tool and Curve Tool
2.1 Pen Tool
*Although the Pen Tool is available in both Adobe Illustrator and Photoshop, this tutorial will focus on using it in Illustrator.

The Pen Tool is a tool that allows you to draw straight lines and Bézier curves. It is such an essential tool in Illustrator that mastering it is often considered a prerequisite for using the program effectively. Because its operation is unique, practice is necessary to understand its characteristics and be able to draw shapes exactly as you envision them.
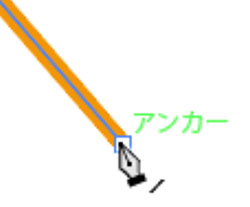
As shown in the figure below, when you draw a curve by dragging with the Pen tool, guide lines called handles (also known as direction lines) appear from the anchor points. You can control the curvature of the curve by adjusting these handles. Curves drawn with the Pen tool are Bézier curves, and the curve is drawn so that the handles touch the anchor points.
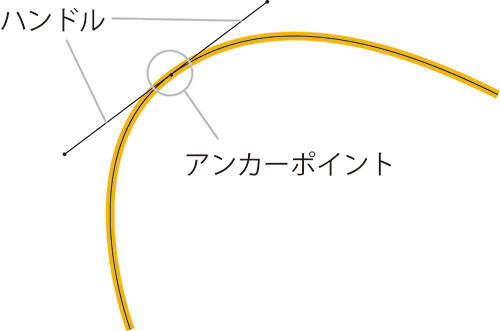
The line segments created between anchor points are called segments, and these segments connect to form the entire path.

2.2 Curve Tool (Illustrator CC 2014 and later) (Introduction only)
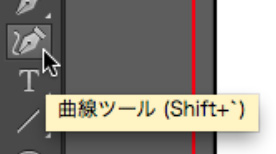
The Curve Tool is a new tool introduced in Illustrator CC 2014.It is also included in the Adobe Illustrator Draw iPad app, released in October 2014. Unlike the Pen Tool, it allows you to draw straight lines and curves using simple, click-based operations. While you may need to use the Pen Tool to draw very precise curves, it is a very convenient tool for easily drawing continuous curves. Since objects drawn with the Curve Tool are also Bézier curves, they can be adjusted using the Pen Tool.
3. Handle Variations
When drawing Bézier curves with the Pen tool, you can adjust the handles to change the shape of the curve. Depending on how you manipulate them, there are five variations of these handles.
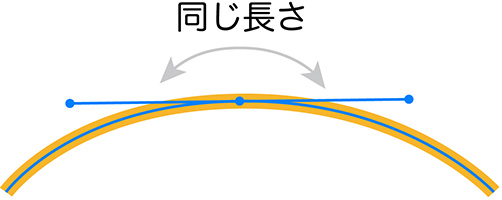
3.1 Two Integrated Handles (Same Length)
The initial state after drawing by dragging the Pen Tool. Alternatively, the state after dragging an existing anchor point with the Anchor Point Tool. (See Drawing Method 2)
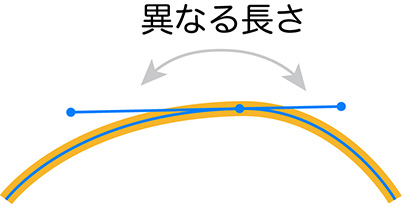
3.2 Two Integrated Handles (Different Lengths)
With the settings in Section 3.1, one handle has been scaled using the Direct Selection tool. (See Drawing Technique 2.)
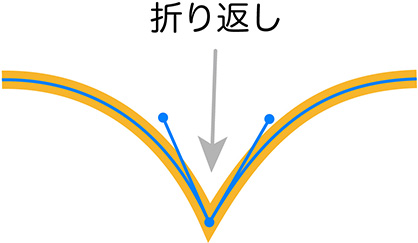
3.3 Folded Handle
This shows the state after pressing the OPTION key while dragging with the Pen Tool to create a bend. Alternatively, it shows the state after bending one of the handles in the 3.1 or 3.2 configuration using the Anchor Point Tool. (See Drawing Technique ③)
3.4 A Single Handle
The state of the handle when drawing from a straight line to a curve, or from a curve to a straight line. (See Drawing Techniques 4 and 5.)

3.5 No Handle
A path composed of straight lines. (See Drawing Technique 1)

4. Direct Selection Tool

The Direct Selection tool allows you to manipulate anchor points and handles on Bézier curves.
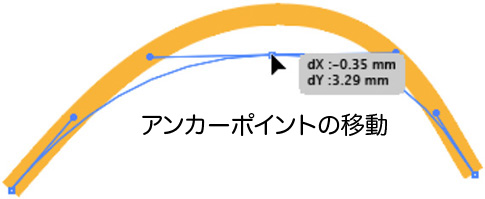
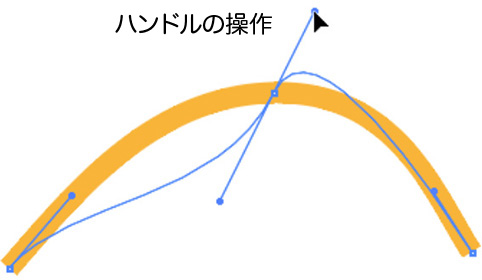
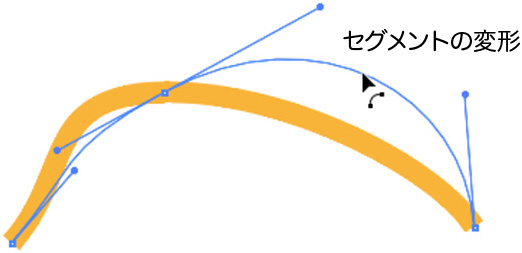
Drag along the segment to adjust the curve while keeping the anchor points in place.
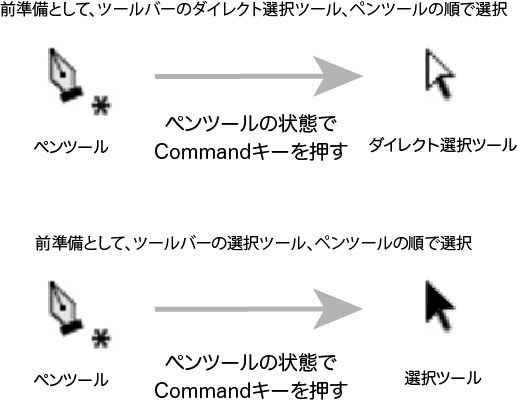
Normally, when you select the Direct Selection Tool (P) from the toolbar, it remains active at all times. However, in this case, we’ll work using a method where the Pen Tool remains active as the default tool, and it switches to the Direct Selection Tool only when the Command key is held down.
*This applies only when you click the Direct Selection Tool and then the Pen Tool in that order from the toolbar. If you click the Selection Tool and then the Pen Tool, the Selection Tool will be active when you press the Command key.
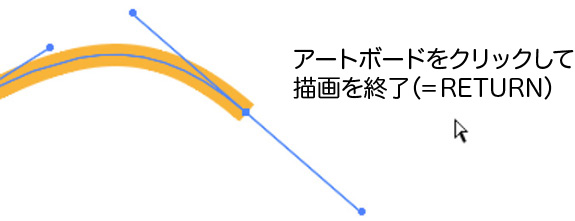
After drawing a line with the Pen tool, you can exit drawing mode and draw the next line by holding down the Command key and clicking on an empty area of the artboard. You can also do this by pressing the Return key. This is not necessary if you are closing the shape.
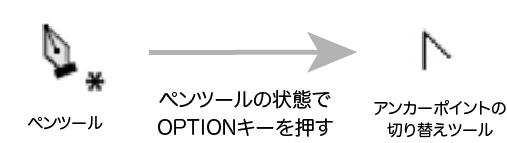
5. Anchor Point Switching Tool

*To place an anchor point along a path, you must select a segment or an anchor point using the Direct Selection tool.
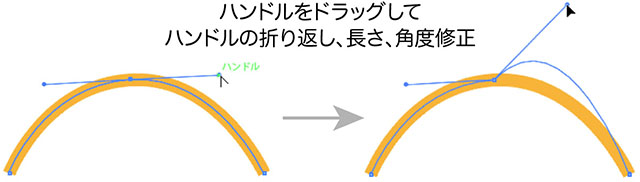
With the Anchor Point Switching Tool, you can drag the end of an existing handle to bend it, or adjust its length and angle.
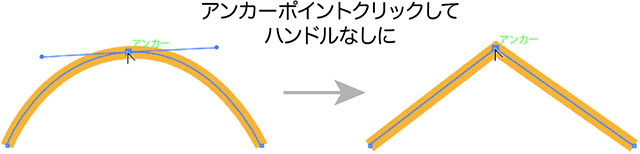
If you click on an anchor point that already has handles using the Anchor Point Switching Tool, it will change to an anchor point without handles.
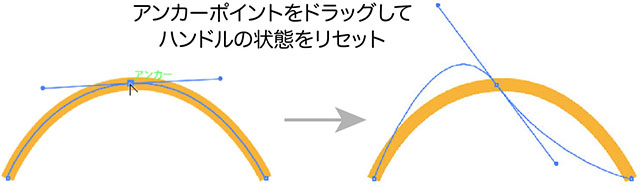
If you drag on an existing anchor point, the handles are reset and merge into a single handle of the same length.
Normally, when you select the Anchor Point Selection tool (SHIFT+C) from the toolbar, it functions as the Anchor Point Selection tool at all times. However, in this case, we’ll work using a method where the Pen tool remains active, and the Anchor Point Selection tool is activated only when the OPTION key is held down.
6. Add/Remove Anchor Point Tool
6.1 Add Anchor Point Tool

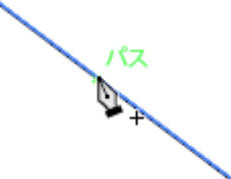
The Add Anchor Point tool allows you to click on a path to add an anchor point. When you hover over a path while the Pen tool is selected, the cursor automatically switches to the Add Anchor Point tool, allowing you to click to add an anchor point.
6.2 Anchor Point Deletion Tool

The Anchor Point Deletion Tool allows you to delete existing anchor points by clicking on them. When you hover over an existing anchor point while in Pen Tool mode, the tool automatically switches to the Anchor Point Deletion Tool, allowing you to click and delete the anchor point.

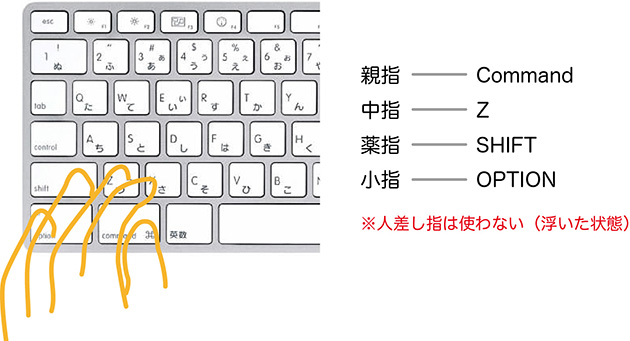
7. How to Use the Keyboard
To work efficiently while switching between the Pen Tool, Direct Selection Tool, Anchor Point Tool, and other tools, you need to use keyboard shortcuts.
Here’s an example of how I use it: I try to use my left hand for the functions listed below.
- Pen Tool + Command: Direct Selection Tool
- Pen Tool + Option: Anchor Point Tool
- Command + Z: Undo
- Shift: Align to axis, etc.
The figure below shows the keyboard layout on the left.
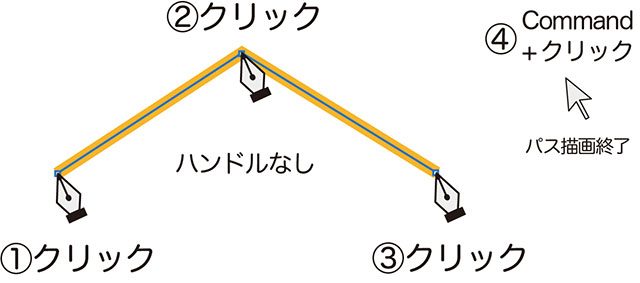
8. Drawing Technique 1: Straight Line to Straight Line
*As a preliminary step, set the line color only (without a fill color) and set the line weight to 4pt.
Use the Pen Tool to click and create line segments as shown in the figure below. Finally, hold down the Command key and click in an empty area to finish drawing the path.
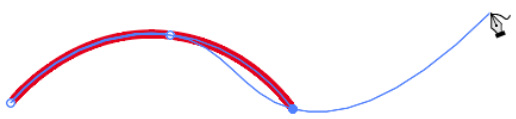
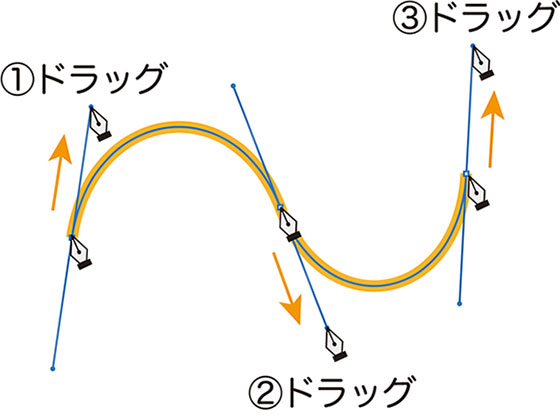
9. Drawing Technique 2: Curve to Curve (Continuous)
As shown in the figure below, drag the Pen Tool to draw a curve. The shape of the curve changes depending on the length and angle of the handles.
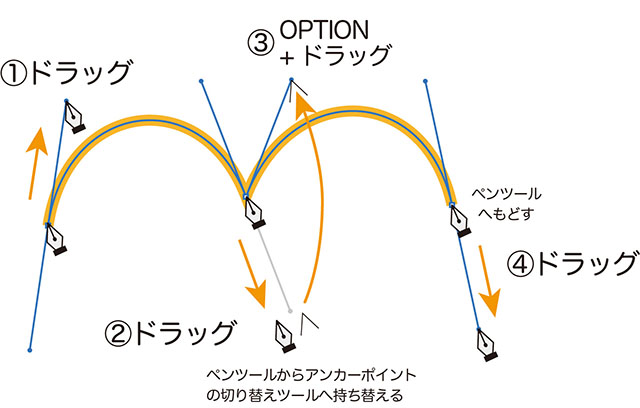
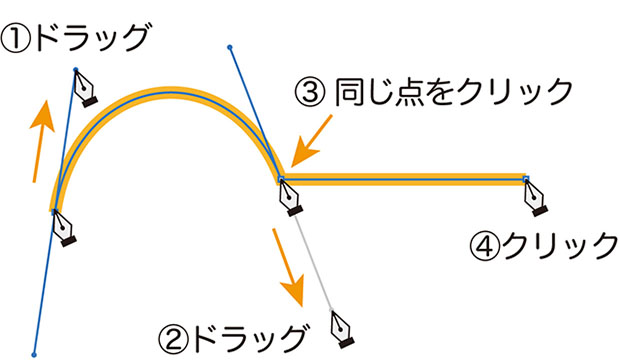
10. Drawing Technique 3: Curve to Curve (Folded)
To bend a curve, use Drawing Method 2: after dragging, press the OPTION key to switch to the Anchor Point Selection tool, then drag the end of the handle.
11. Drawing Technique 4: Curve to Straight Line
To switch from a curve to a straight line, click the same point again with the Pen Tool. The direction handle will disappear, allowing you to draw a straight line from that point.
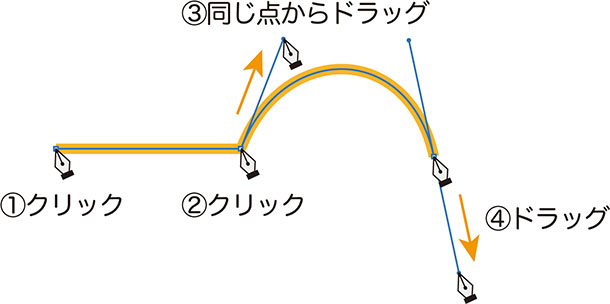
12. Drawing Technique 5: Straight Line to Curve
To switch from a straight line to a curve, keep the Pen Tool selected and drag from the same point as in Drawing Method 2.
13. Closing a Path, Resuming a Path
13.1 Closing a Path
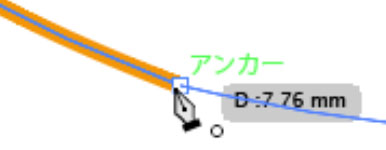
To close a path, click or drag the starting point with the Pen Tool to connect it. When the Pen Tool hovers over the starting point, a circle appears in the lower-right corner of the tool, as shown below.
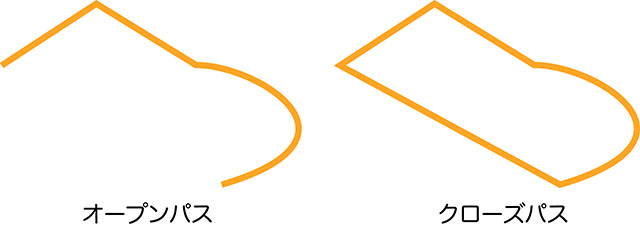
There are two types of paths: open paths and closed paths. An open path is one where the start and end points do not meet, as shown on the left in the figure below. A closed path is one where the start and end points meet, as shown on the right in the figure below.
13.2 Resuming a Path
To connect an open path after you’ve finished drawing it, click or drag the end of the path with the Pen tool. Whether you clicked or dragged to end the path affects the state of the connected path. If necessary, use the Anchor Point Switch tool to make adjustments.
If a slash appears in the lower-right corner of the Pen tool, as shown in the figure below, it indicates that the path has been resumed.
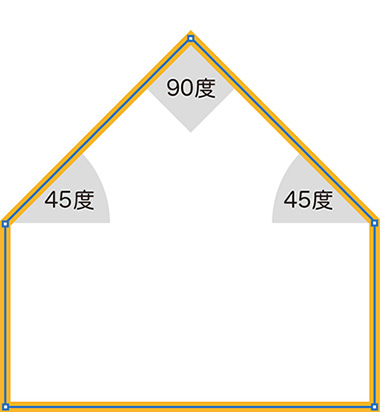
14. Practice Shape 1: House
Create a shape consisting solely of lines, as shown below. To draw lines at 45-degree or 90-degree angles, hold down the SHIFT key while clicking. You can also use Smart Guides to precisely align the shape horizontally or vertically.
15. Practice Shape 2: Circle
Create a circle as shown below. To make the handles horizontal or vertical, hold down the SHIFT key while dragging.
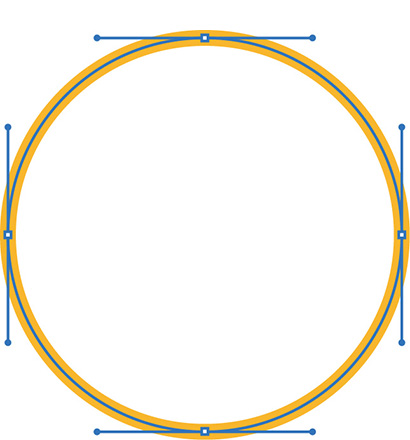
In this example, I used the Pen Tool to create a circle for practice, but in reality, drawing a perfect circle using only the Pen Tool is difficult and time-consuming. In Illustrator, you can easily draw perfect circles and ellipses using the Ellipse Tool, so if you need a precise circle, use the Ellipse Tool.
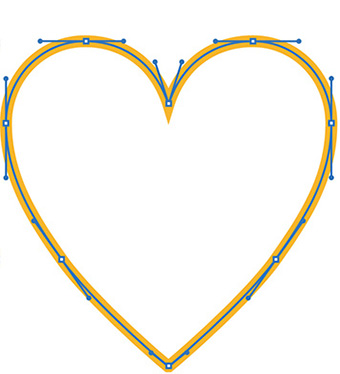
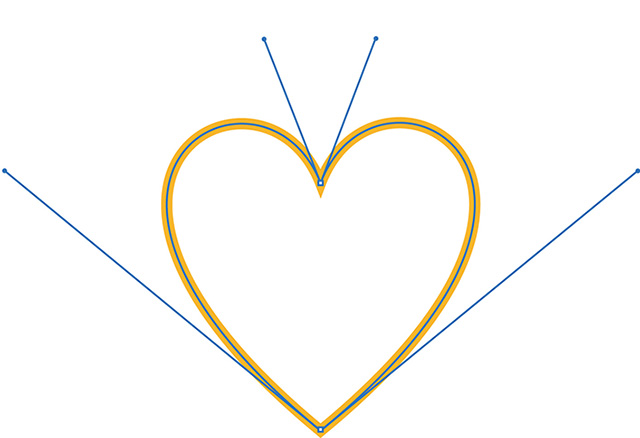
16. Practice Shape 3: Heart
As shown in the two examples below, even the same heart shape can be drawn using different numbers of anchor points. If there are too many anchor points, the curve tends to become jagged; however, if there are too few, you cannot draw the desired curve. Drawing with the minimum number of anchor points results in a smooth curve.
17. Editing Existing Objects and Text
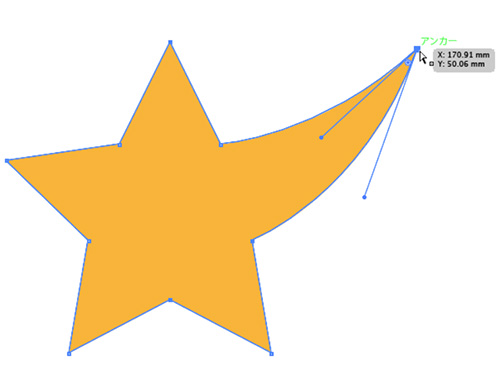
17.1 Modifying Existing Objects
Objects created with the Rectangle Tool, Ellipse Tool, Polygon Tool, and other tools are also made up of paths, so you can edit them using the Direct Selection Tool or Pen Tool.
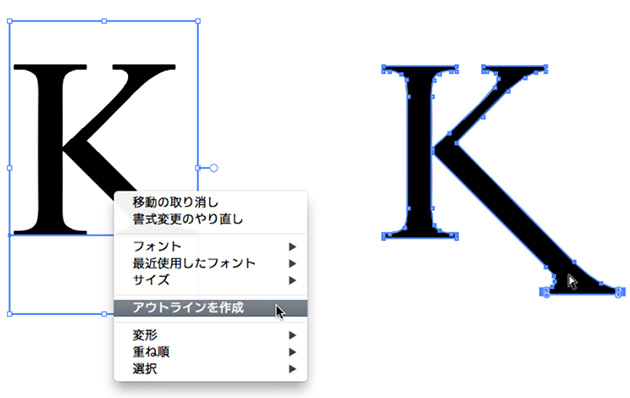
17.2 Modifying Existing Characters
To edit the design of text, convert it to outlines. Right-click on the text entered with the Text tool (as shown on the left in the figure below) to display the context menu, then click “Create Outlines.” The text will be converted to paths, allowing you to edit it using the Direct Selection tool or the Pen tool (as shown on the right in the figure below). Once text has been converted to outlines, you cannot retype it using the Text tool.
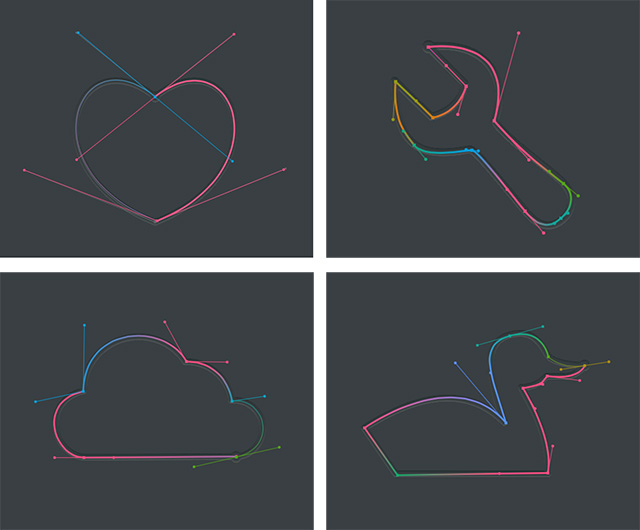
18. Bézier Game
Once you’ve gotten the hang of the Pen Tool, try your hand at the Bézier Game below. If you can make it all the way through, you might just call yourself a pro!
Bézier Game is a website created by interaction designer Mark MacKay that allows users to practice Bézier curves in a game-like setting.
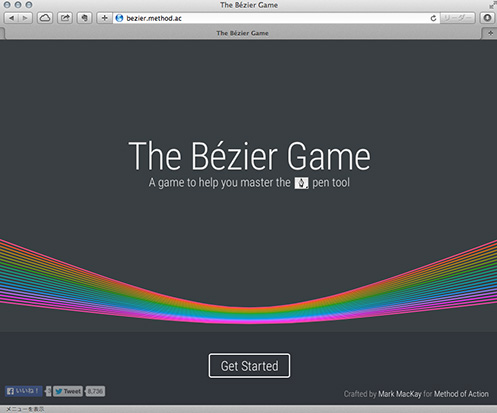
The game features a practice mode that teaches the basics, as well as a mode where you must complete complex shapes within a limited number of moves. To reach the final stage, you must understand the characteristics of Bézier curves and draw while anticipating the path ahead. Aside from clicking and dragging with the mouse, the only keys you can use are the SHIFT and OPTION keys. Since these keys can only be used on grooved lines, you must operate within even more restricted parameters than with Adobe Illustrator’s Pen Tool. The Cmd+Z Undo function is available.
19. Other Related Tools
19.1 Scissors

Click to split the path.
19.2 Knife

You can split an object by dragging along the selected closed path. Even if the path isn’t closed, using the Knife tool will force it to close before processing.
19.3 Eraser Tool

Dragging along a selected closed path allows you to split the object while deleting sections equal to the cursor size. Double-click on the tool panel to adjust the thickness, circularity, and angle.