Optical Illusions
Updated: 2026-05
This article was written before 2020. It is kept here as an archive — the content is outdated and some links may no longer work.
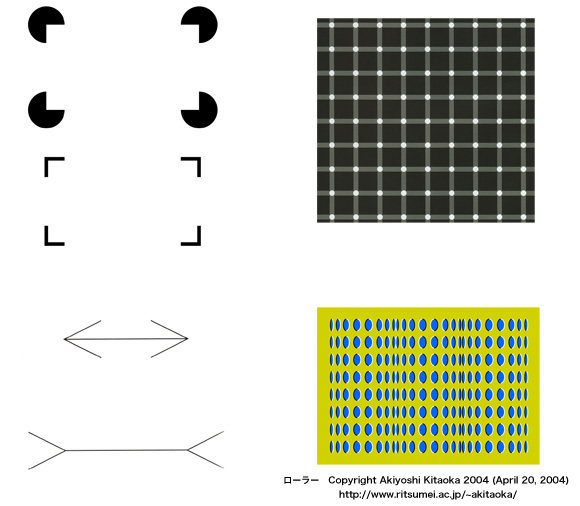
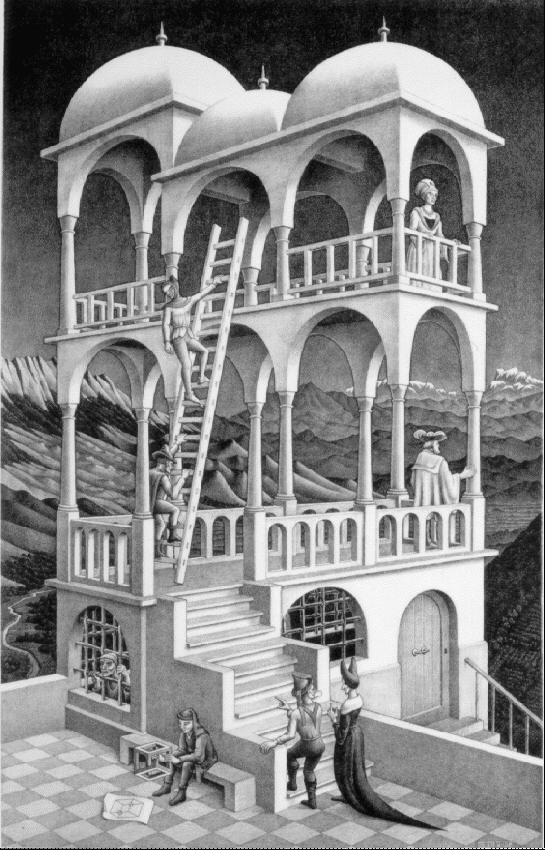
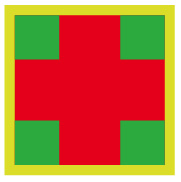
Here, we will provide a brief overview of the world of optical illusions. As shown in the figure above, a wide variety of optical illusions have been discovered. You can find a wealth of information on optical illusions on Professor Kitaoka’s website at Ritsumeikan University.
On the Japanese word “sakushi” (excerpt)
“The term ‘sakushi’ refers to what is commonly known as an optical illusion. While the English terms ‘visual illusion’ or ‘optical illusion’ are broad concepts that include impossible figures, inverted figures, and trompe-l’œil, the Japanese term ‘sakushi’ is somewhat ambiguous in that regard.” (Professor Akiyoshi Kitaoka, Ritsumeikan University, http://www.ritsumei.ac.jp/~akitaoka/)
The Hollow-Face Illusion
The Hollow-Face Illusion (wiki: Hollow-Face Illusion) is an optical illusion in which a concave surface is perceived as convex.
The image below shows a “Hollow-face illusion” canvas print available for sale on Amazon.com.
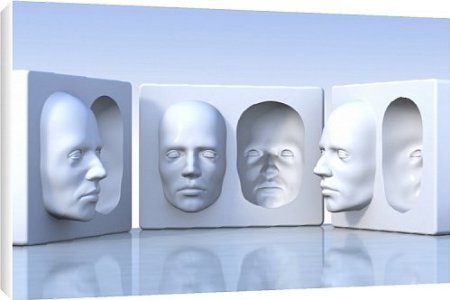
The Einstein Hollow Face Illusion
http://www.grand-illusions.com/acatalog/Einstein_Hollow_Face_Illusion.html
The Trick Art Dragon
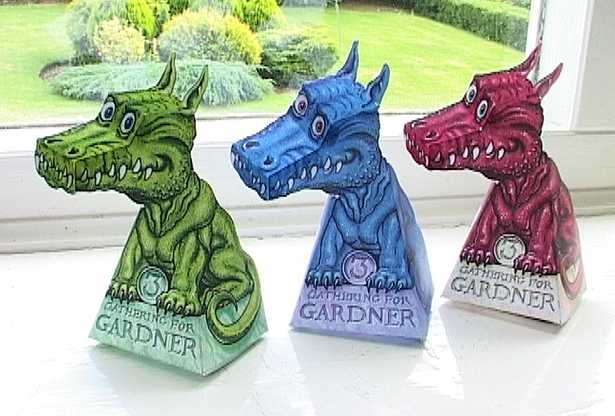
The Trick Art Dragon was created in 1998 by Jerry Andrus, a “visionary illusionist” and magician, to honor the achievements of mathematician Martin Gardner. Martin Gardner coined the term “Mathemagician” and is famous for bringing mathematics into the realm of entertainment.
Anyone can make the Trick Art Dragon by downloading the data from the website below. It’s easier to assemble if you print it on cardstock.
http://www.grand-illusions.com/opticalillusions/three_dragons/
Trompe-l’œil
Trompe-l’œil is also known as trick art. In French it is called “Trompe-l’œil,” but the term “Trick Art” seems to be common today. Several examples of trompe-l’œil can be found on Professor Kitaoka’s website at Ritsumeikan University.
The Crevasse — The Making of 3D Street Art
Escher’s Optical Illusions
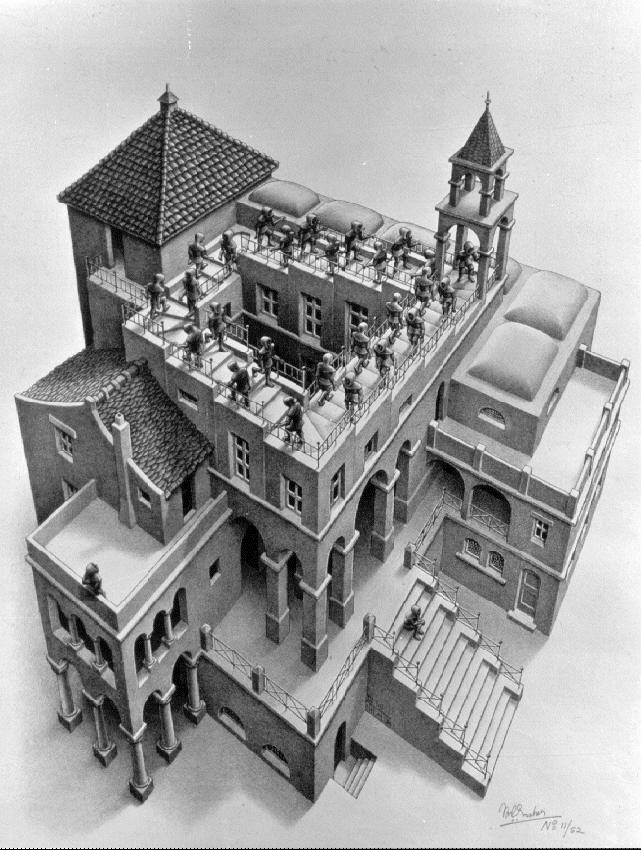
Ascending and Descending
Belvedere (Lookout Tower)
Jun Fujiki: OLE Coordinate System
Infinite Corridor: PlayStation Portable
3D Optical Illusions (Professor Sugihara, University of Tokyo)
10 optical illusions in 2 minutes
Assignment 1: Building the Trick Art Dragon
Let’s create the trick art dragon I mentioned earlier. You can download the PDF files for each color from the “You can download the GREEN DRAGON, download the RED DRAGON, or download the BLUE DRAGON” section on the website below.
http://www.grand-illusions.com/opticalillusions/three_dragons/
In class, we will use the materials that have already been printed on cardstock. Choose your favorite color from blue, red, or green.
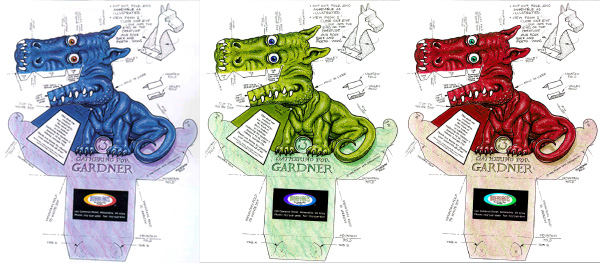
Cut out the pieces with scissors or a craft knife, then glue or tape them together. It’s in English, but it’s simple enough to figure out.
- MOUNTAIN FOLD
- VALLEY FOLD
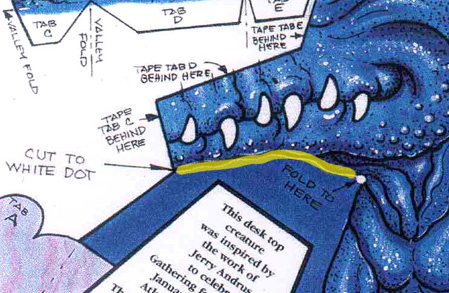
CUT TO WHITE DOT (Cut up to the white dot—the yellow line in the figure above)
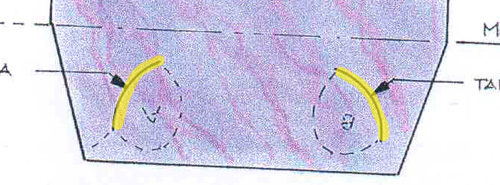
Use a utility knife to cut along the yellow line shown in the figure above.
Assignment 2: Creating an Optical Illusion Using Illustrator
In this section, we will recreate the optical illusion created by Akiyoshi Kitaoka using Adobe Illustrator.
*We have obtained permission from Professor Kitaoka to publish the content presented here. However, please note that Professor Kitaoka does not endorse the production methods described here; they are solely the personal methods of Nakayasu.
Please note that this exercise is not intended solely for tracing; we encourage you to experiment with different colors or modify the pattern in your own way. Submit both a PDF file and a printed copy. Be sure to include your student ID number and name on the printed copy.
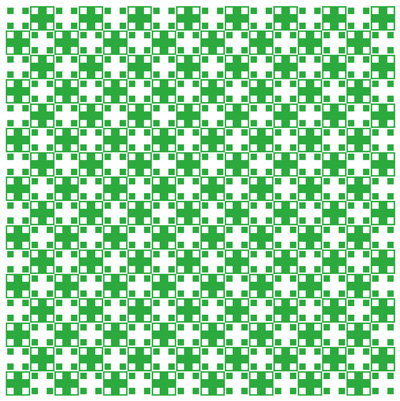
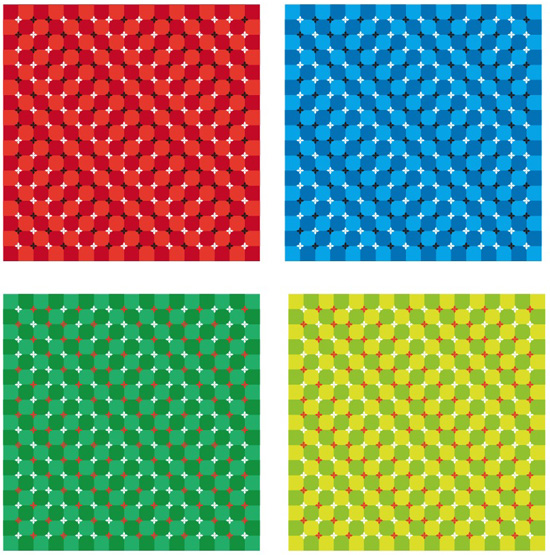
“The Illusion of Bulge” Copyright A. Kitaoka 1998
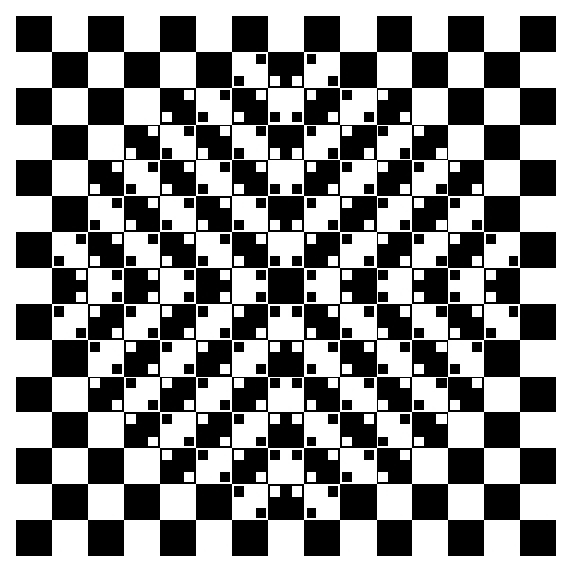
Although the checkered floor appears to be bulging out toward us, physically speaking, it is drawn entirely as squares; the perceived roundness is an optical illusion.
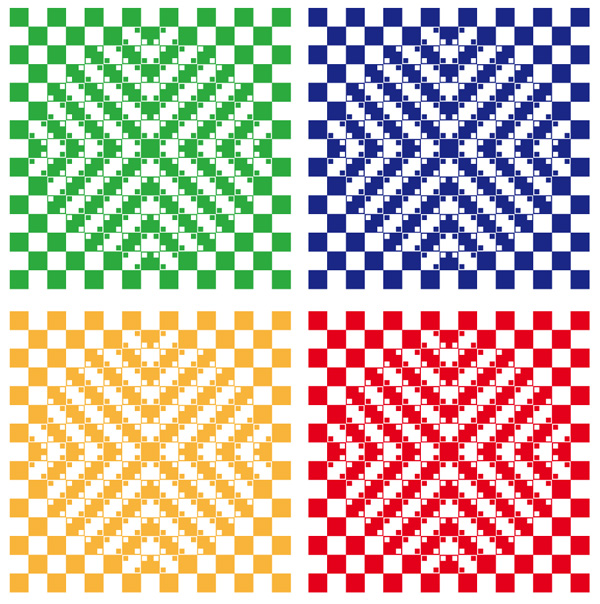
“Field of Primroses” Copyright Akiyoshi Kitaoka 2002
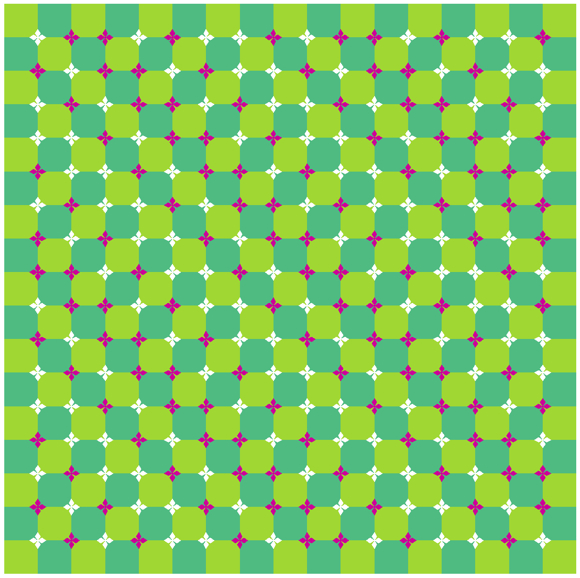
Although the checkered pattern in the background consists entirely of squares, it appears to undulate.
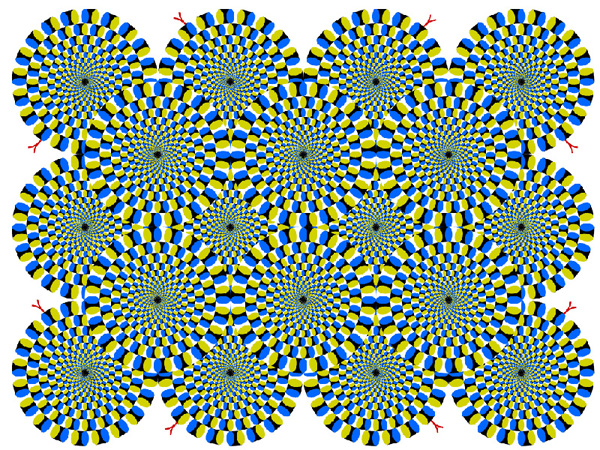
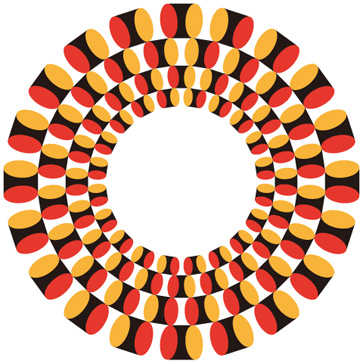
“The Rotating Snakes” Copyright Akiyoshi Kitaoka 2003 (September 2, 2003)
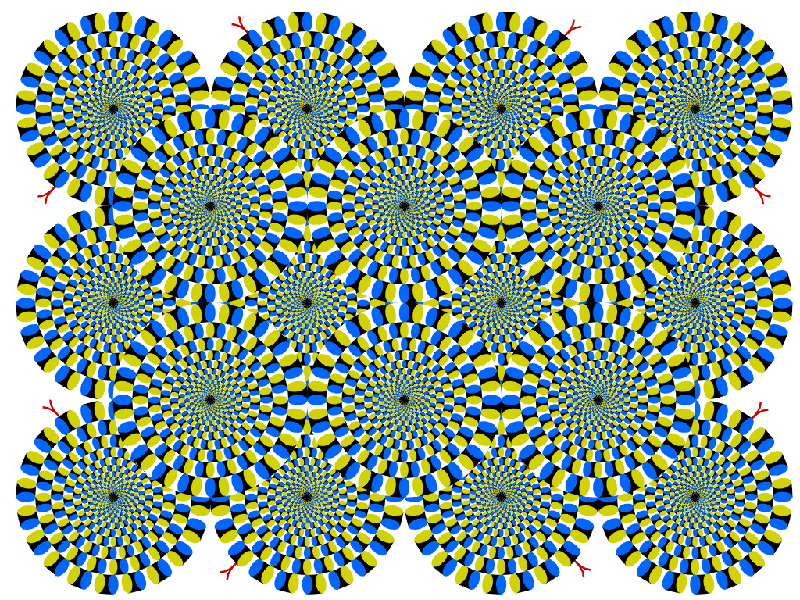
The snake-shaped disc appears to be spinning on its own.
Assignment 2-A: The Bulge Illusion
“The Illusion of Bulge” Copyright A. Kitaoka 1998
If you simply want to repeat a pattern in Illustrator, you can use the “Pattern” feature. However, if parts of the pattern need to vary in different ways—as in an optical illusion—it’s often faster to create it manually. Here, I’ll explain how to do that manually.
(How to create a checkered pattern using a template: http://designers-tips.com/archives/1762)
① Create a new document file
A4 portrait orientation. Save the file with the name “Illusion of Bulge + Student ID + Name.”
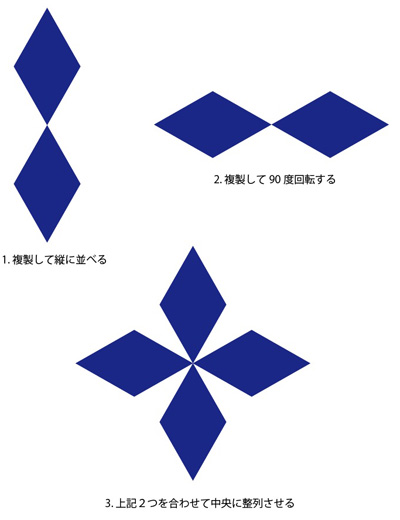
② Create Pattern A
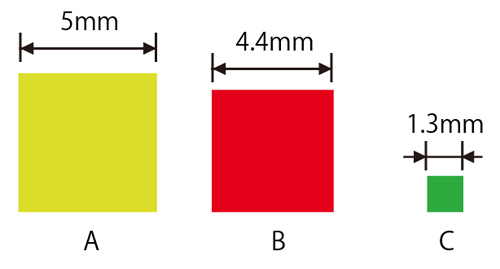
- Create the larger square (5 mm per side, Square A) using the Rectangle Tool in manual mode.
- Create the guide square (4.4 mm per side, Square B) using the Rectangle Tool in manual mode.
- Create the smaller square (1.3 mm per side, Square C) using the Rectangle Tool in manual mode.
*Note: The dimensions are approximate and based on the sample, so feel free to adjust them. *Note: All square lines have a line weight of 0; they are filled with color for clarity.
Duplicate Square C four times. Using Square B as the base, align the four copies of Square C with the four corners of Square B. Use the Align panel to align them. Apply the Align command to the selection. Group Square B and the four copies of Square C together. (Square B + 4C)

Use the alignment panel to center Square A and Square B+4C.
Ungroup the square B and the four circles, then delete the square B.
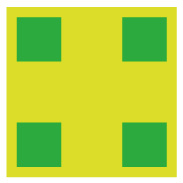
Group square A and the four squares C together. (Pattern A = square A + 4C is complete.)
③ Create Pattern B
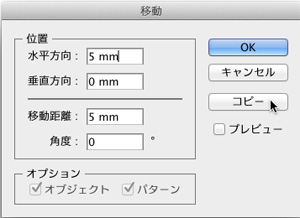
Duplicate Pattern A twice, placing them side by side. Go to the Object menu > Transform > Move and move them 5 mm to the right. Instead of clicking OK, click Copy.
Furthermore, if you duplicate them vertically twice, you get the figure below.
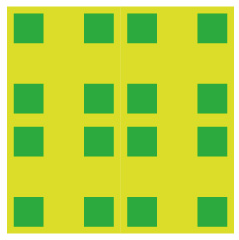
Ungroup as needed, change the colors, and delete any unnecessary shapes, as shown below. Group everything together. (Pattern B is complete.)

④ Arrange Pattern B
The illusion of the pattern expanding can be created by arranging eight 8×8 Pattern B tiles side by side and then removing one row. When arranging them, simply move each tile 10 mm. Once you’ve used the move function, you can repeat the process by pressing Command+D to duplicate the pattern.
⑤ Carefully remove the unnecessary parts from the image above
You can work more efficiently by using the Lock (Cmd+2) and Unlock (Cmd+Alt+2) functions. By selecting all squares of the same color under Select > General > Appearance, you can change their colors all at once.
Once you get the hang of it, you’ll likely come up with more efficient ways to work, such as using layers or color-coding elements along the way to make it easier to select different objects.
Assignment 2-B: Field of Primroses
“Field of Primroses” Copyright Akiyoshi Kitaoka 2002
Here, we will be creating a field of primroses.
① Creating Primroses
First, draw a rhombus. There are several ways to draw a rhombus, but as a preliminary step, start by drawing a square and rotating it 45 degrees. When rotating, hold down the SHIFT key to rotate in precise 45-degree increments, so stop at 45 degrees.
Next, I’ll introduce three methods (labeled A through C) for stretching a rotated square horizontally. You can use any of these methods, but personally, I prefer C.
A. How to change the width of the control panel
B. How to Use the Zoom Tool

C. Create a base rectangle, combine the two, and apply a stretch effect

To put it another way, if you intersect the shapes in the figure above using the Pathfinder, you can easily transform them. It does add an extra step, though, so it doesn’t really make much of a difference.
Next, duplicate the resulting diamond shape twice vertically. Then duplicate it again, rotate it, and align the centers.
② Create your work by referring to the methods used in the illusion of volume
From here on out, I’ll try to come up with some ideas on my own.
Assignment 2-C: Rotating Snakes (Failed Method)
“The Rotating Snakes” Copyright Akiyoshi Kitaoka 2003 (September 2, 2003)
Here, we will create the rotating snake animation used in the title banner. The method described here may not be entirely accurate, but it should be sufficient to create the optical illusion. (Some adjustments may still be needed.)
*Please note that the method described here did not work. However, since it serves as proof—including this optical illusion—that such illusions only occur when the shapes are perfectly aligned, I have chosen to leave it here.
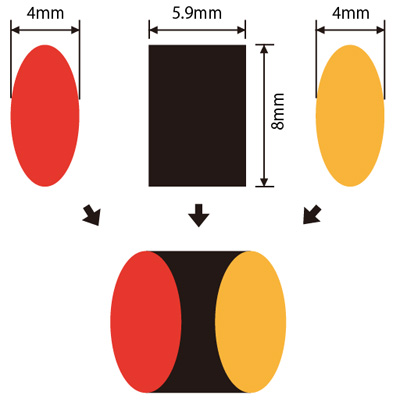
① Creating the base pattern
- Create a square measuring 5.9 mm wide by 8 mm tall
- Create two ovals measuring 4 mm wide by 8 mm tall
- Choose the colors for each as you like
*Note: The measurements here are approximate, so feel free to experiment with different amounts.
Arrange these shapes as shown below.
② Duplicate while rotating
First, place the two base patterns about 75 mm apart. (See the figure on the left below.) Next, tilt each ellipse so that they align at the center. (See the figure on the right below.)
*To tilt an ellipse, you can draw a straight line as shown on the left in the figure below and align the ellipse with it, or you can use the Rotate tool (as instructed in class).
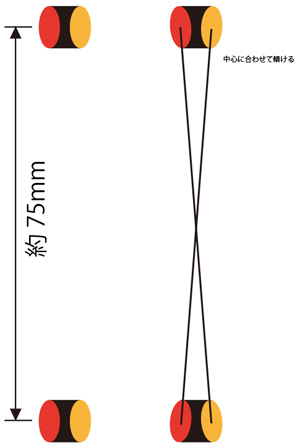
Next, use Object > Transform > Rotate to rotate the object while duplicating it every 18 degrees (creating 20 patterns). Group these together.

③ Duplicate the pattern from step ② and scale it down
Use Ctrl+F to duplicate the object to the front, then hold down Shift+Alt (to maintain the aspect ratio and center the object) while resizing it.

Rotate the inner group 9 degrees.

Group the elements in the image above, duplicate them to the front, and repeat the scaling process as before. Stop once you’ve reached a suitable size.
Next, group the elements shown in the figure above and repeat the same process to fill in the center.
Place a white circle in the background of the top image so that it does not show through when layered, and arrange them as shown in the bottom image.
As with other optical illusions, the way this one appears can vary depending on the pattern’s dimensions and colors, so please treat the measurements provided here as a general guide and experiment with different settings yourself. In the image above, the illusion seems to be rather subtle. (Further research needed)
You can view the paper explaining the principle behind this optical illusion (the Optimized Fraser-Wilcox Illusion) here.
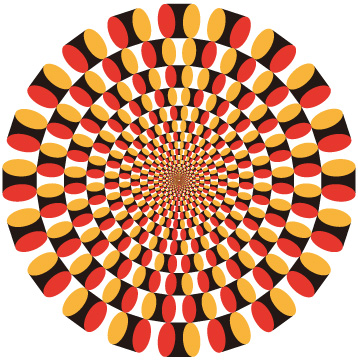
Assignment 2-C: Rotating Snakes (Successful Method)
Here, we’ll create the “Rotating Snake”—which didn’t work out in the previous section—using a different method. Personally, I was able to clearly see the optical illusion. Plus, it’s easier than the method that failed.
Click the image below to enlarge it.
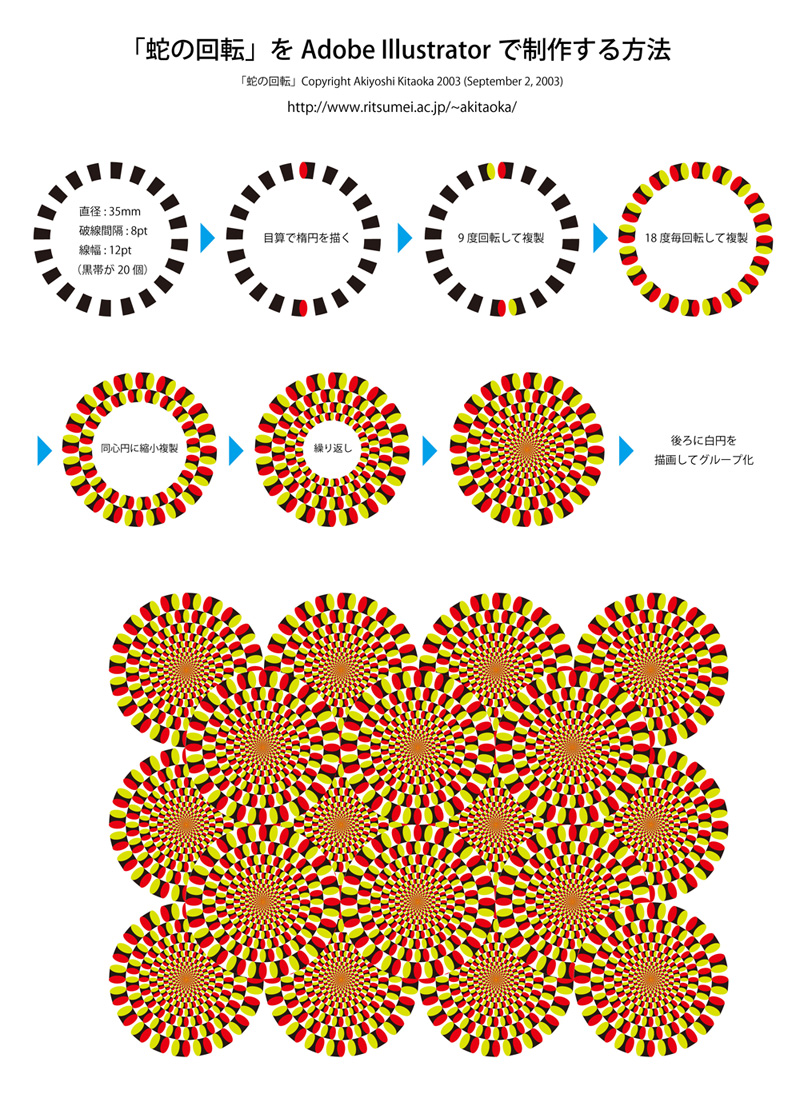
For instructions, refer to the method that failed last time.