Low-Poly Conversion (Remesh and Bake Textures)
Updated: 2026-05*

1. Introduction
This article covers polygon reduction and texture baking workflows.
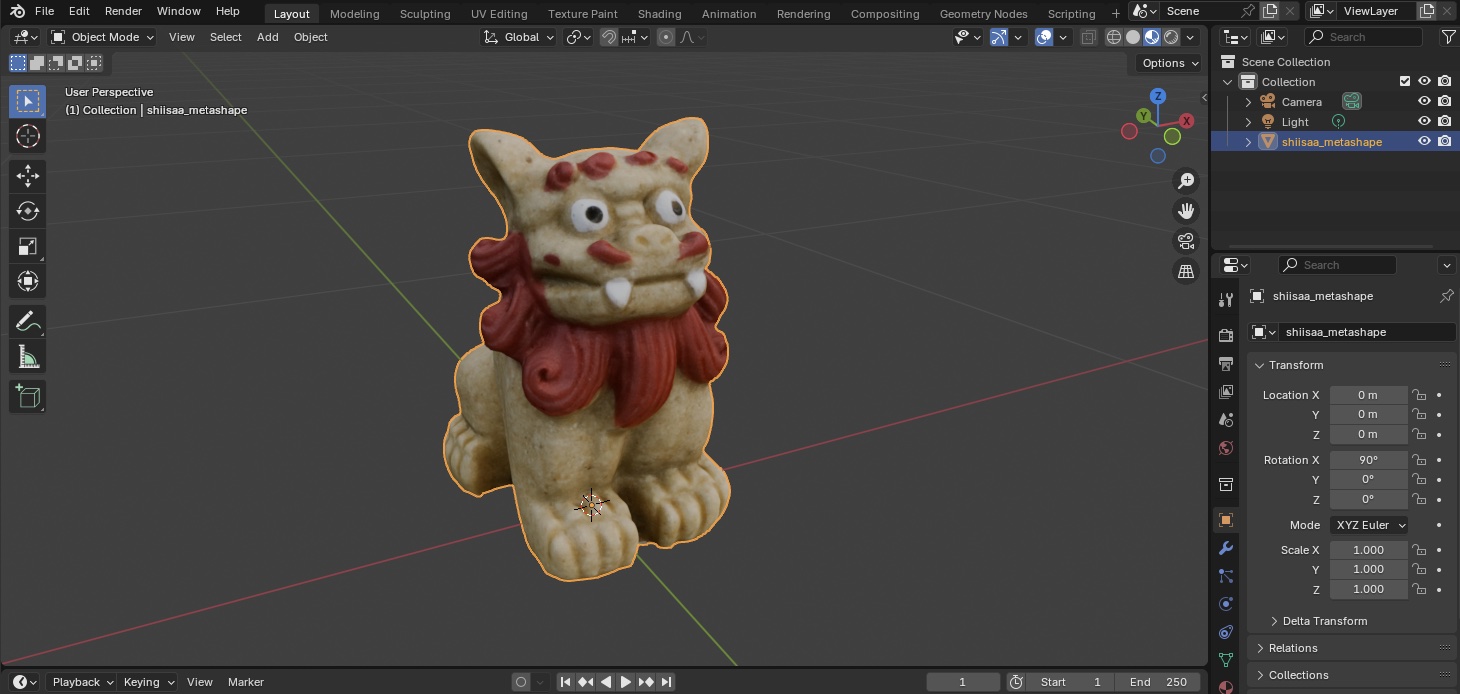
As a warm-up, we use a Shisa figurine dataset (Okinawan guardian creature) to learn polygon reduction and remeshing.
Then we move on to a personal full-body scan dataset. Body scans are geometrically more complex than the Shisa data, so the parameters need to be tuned.
Texture-bake quality depends heavily on the remesh structure and UV unwrap quality. When Blender’s bake quality hits its limits, you’ll often want to switch to ZBrush or a dedicated add-on.
Reference: Retopology-specific Add-ons
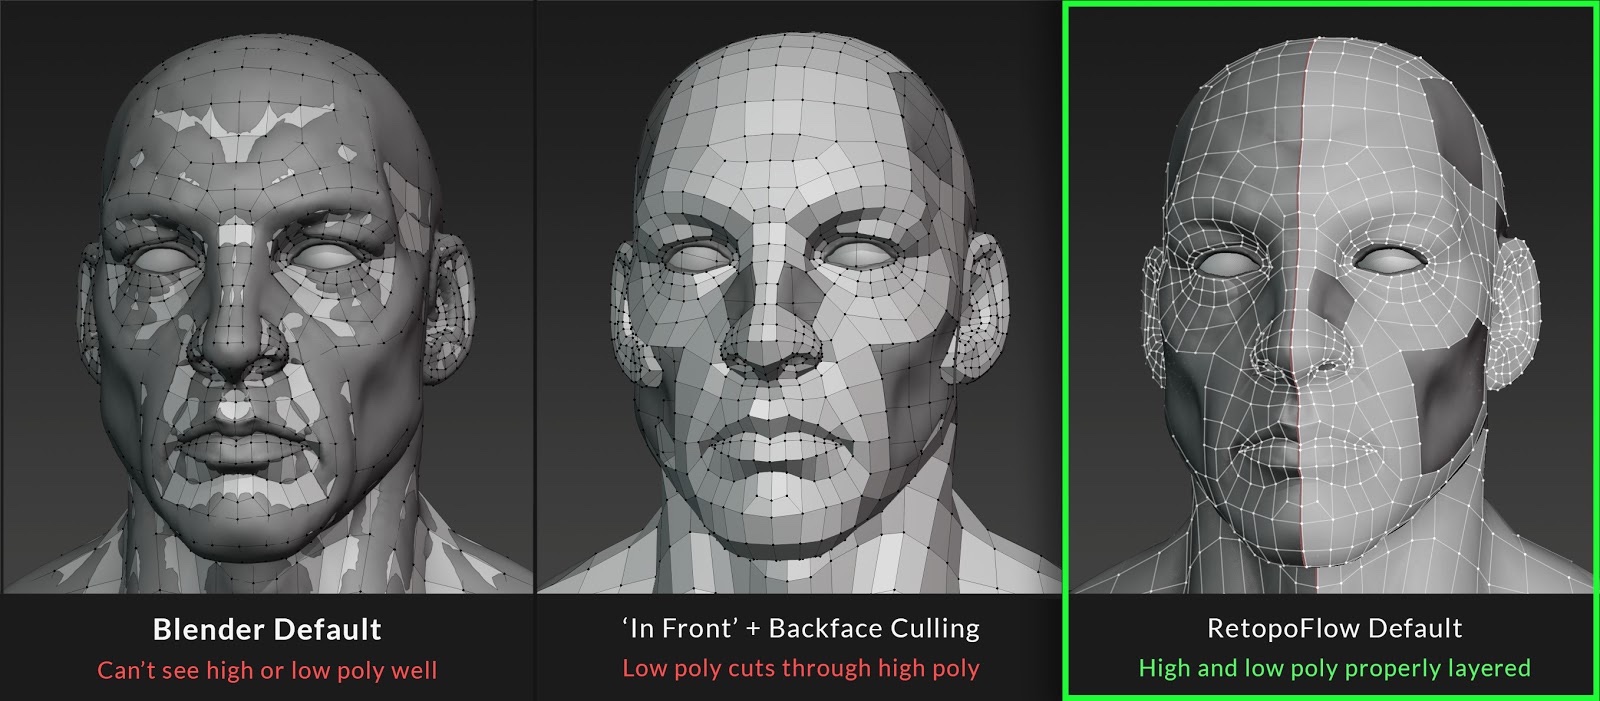
This exercise uses Blender’s built-in Remesh for polygon reduction, but proper retopology can keep the model’s optimal shape while still cutting the polygon count. In sculpt-modeling tools like ZBrush, you typically model freely without worrying about polygon count, then retopologize (rebuild the mesh) afterward. Retopology can be done by hand, but the number of automatic-retopology tools is also growing.
RetopoFlow - Retopology Toolkit for Blender - Blender Market
References:
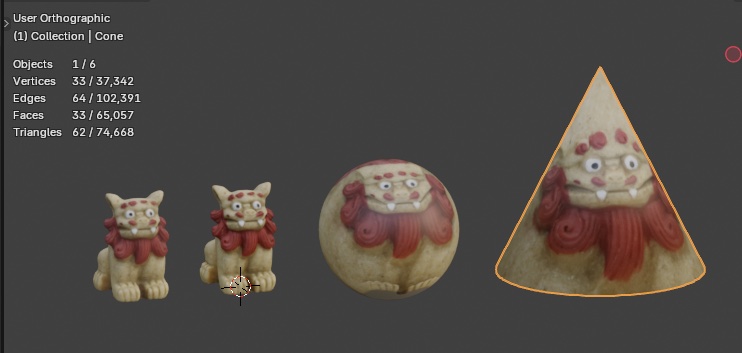
2. Preparing the Practice Shisa Data
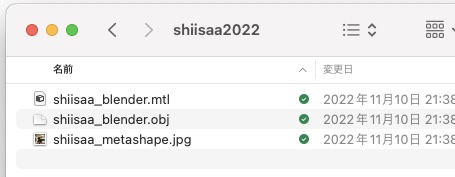
The Shisa data is distributed via Kibaco. Unzip the downloaded shiisaa2022.zip. As shown below, it contains three files: OBJ, MTL, and JPG.
Import the OBJ into Blender. The Viewport Shading shown below is Material Preview.
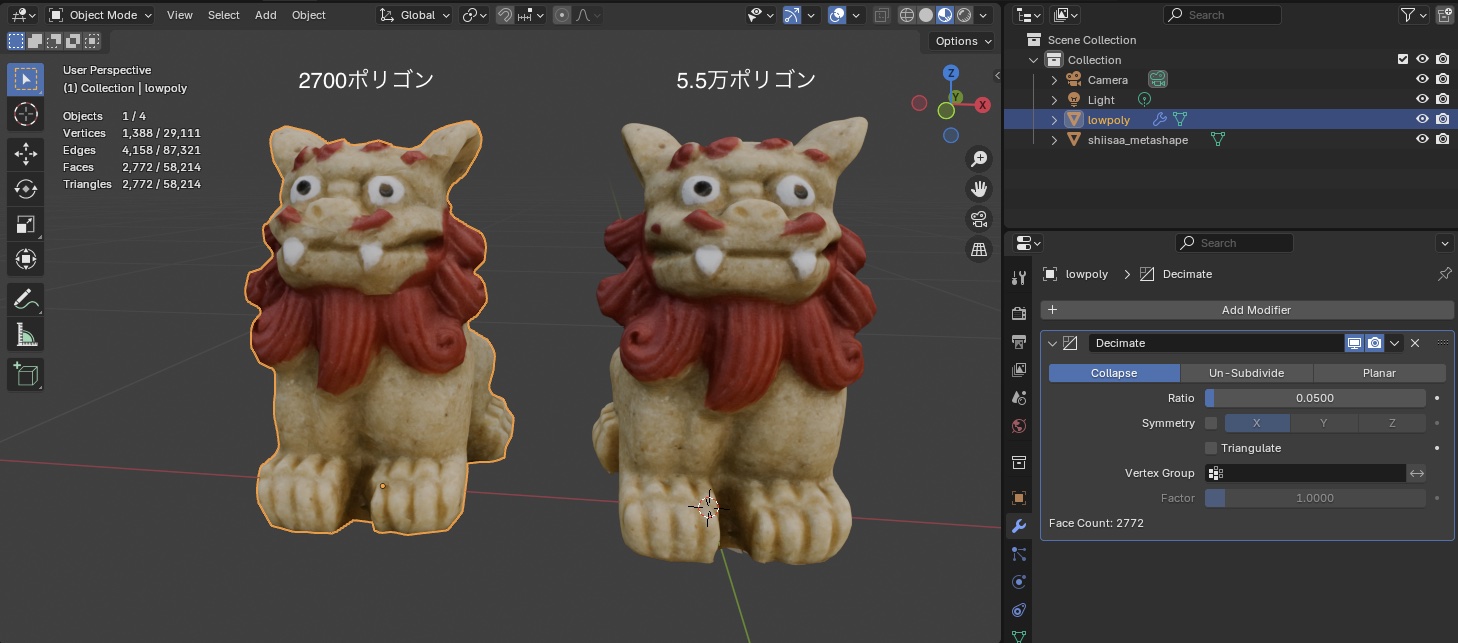
3. Polygon Reduction
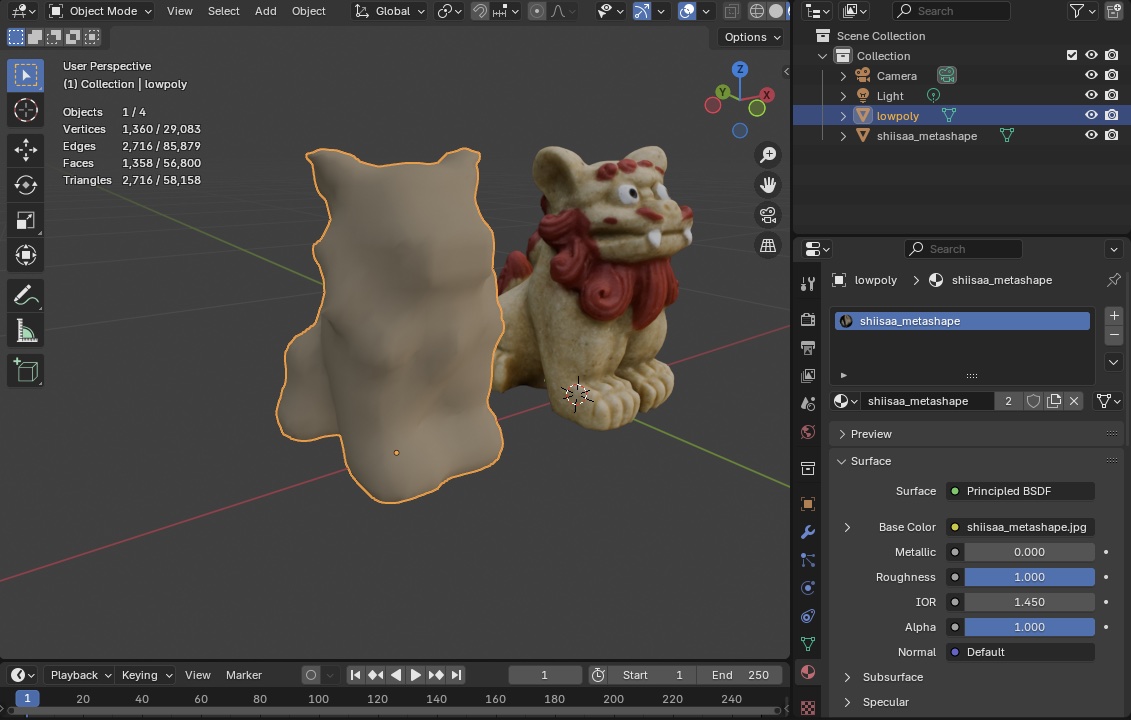
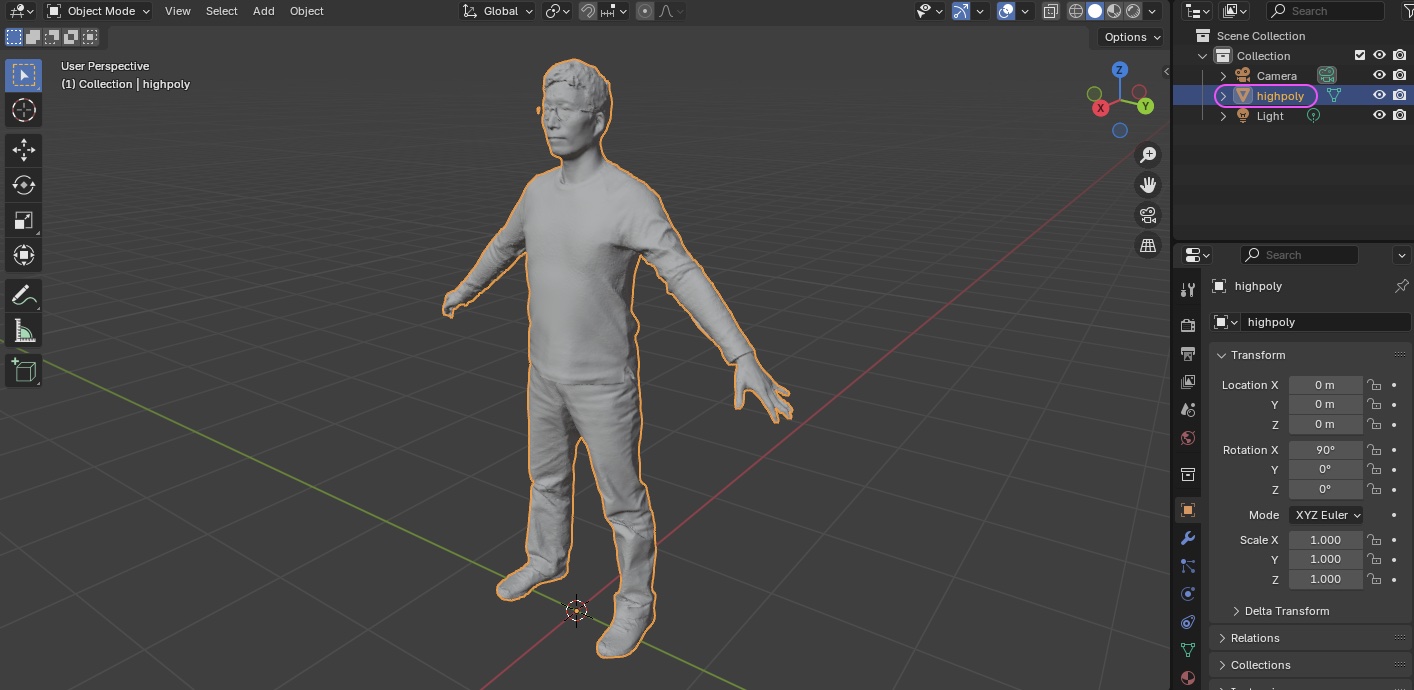
3.1 Duplicating the Model
- Duplicate (SHIFT+D) and move it to the side.
- In the Outliner, rename it to
lowpoly. - Rename the original to
highpoly.

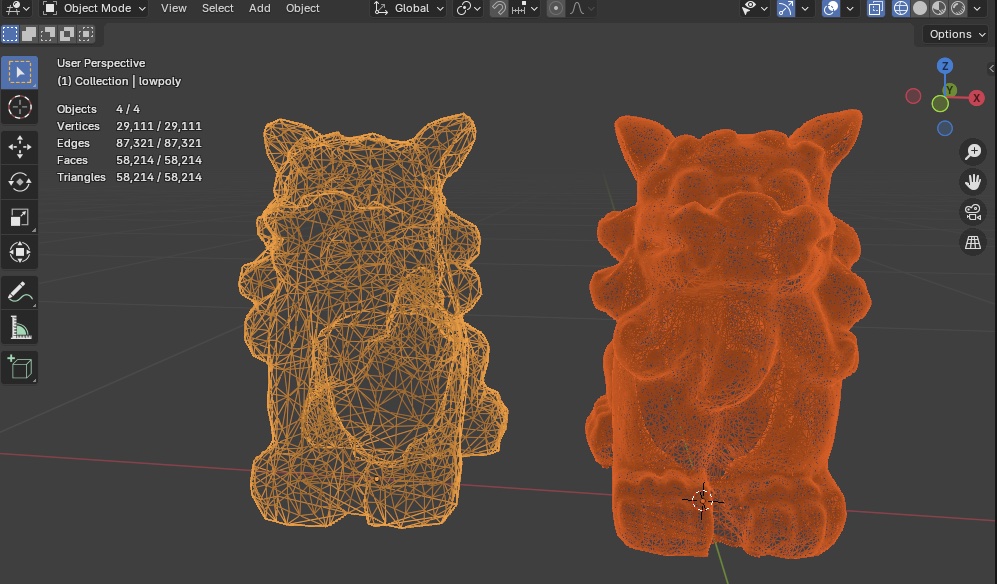
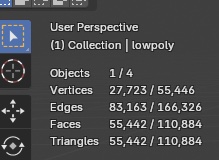
In Viewport Shading, enable Statistics.
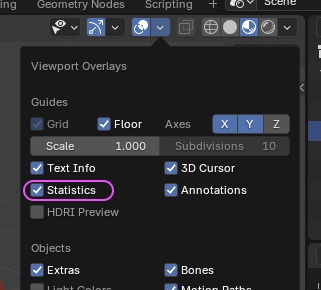
Object info appears at the top-left of the Viewport.
- Triangles (left number): polygons in the selected object.
- Triangles (right number): total polygons displayed in the Viewport.
3.2 Method A: Decimate Modifier (introduction only)
Decimate preserves UVs, so it can reduce polygons while keeping the original texture. Depending on the use case, Decimate works fine.
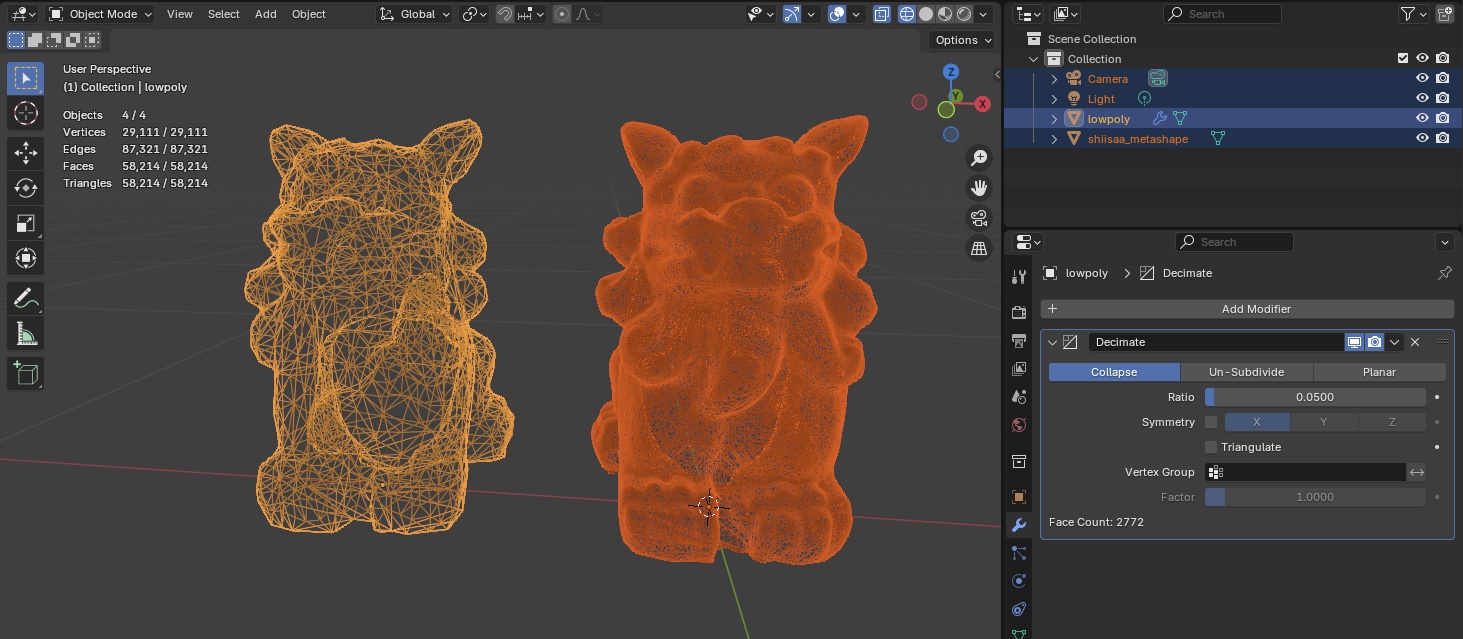
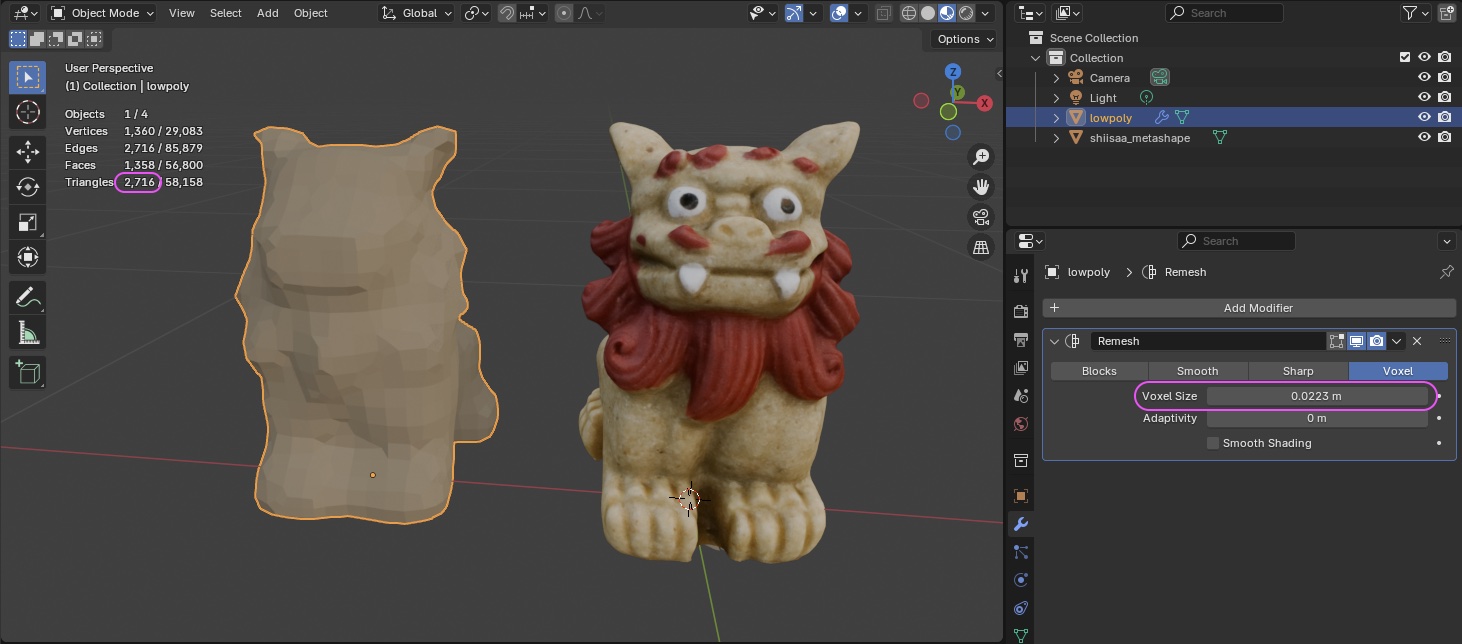
3.3 Method B: Remesh Modifier
For Texture Bake practice, we deliberately use Remesh — which does NOT preserve textures.
- Select the lowpoly model and add a Remesh Modifier.
- Drag Remesh > Voxel > Voxel Size left/right to find the smallest value that still preserves the basic shape.
- In the example below, Voxel Size is around 0.0223.
References:
- Polygon reduction in Blender (JP) | 3DCG school
- Bringing a 100k+ poly avatar down to Quest Medium spec (JP) | Kikujin
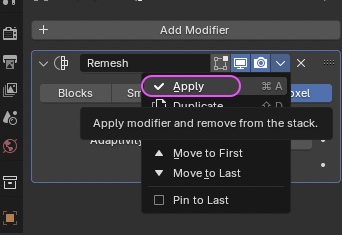
3.4 Applying Remesh
Apply the Remesh Modifier.
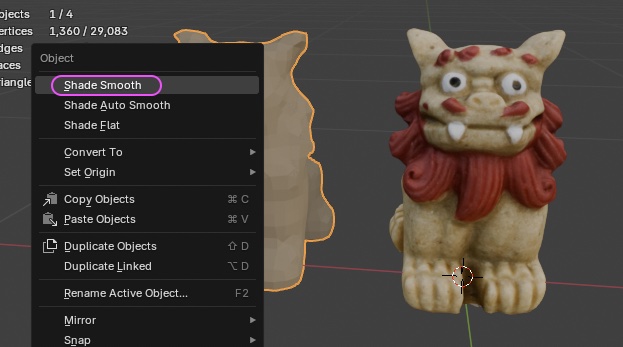
3.5 Smoothing
Set Shade Smooth on both the highpoly and the lowpoly.
Important: both objects need this.
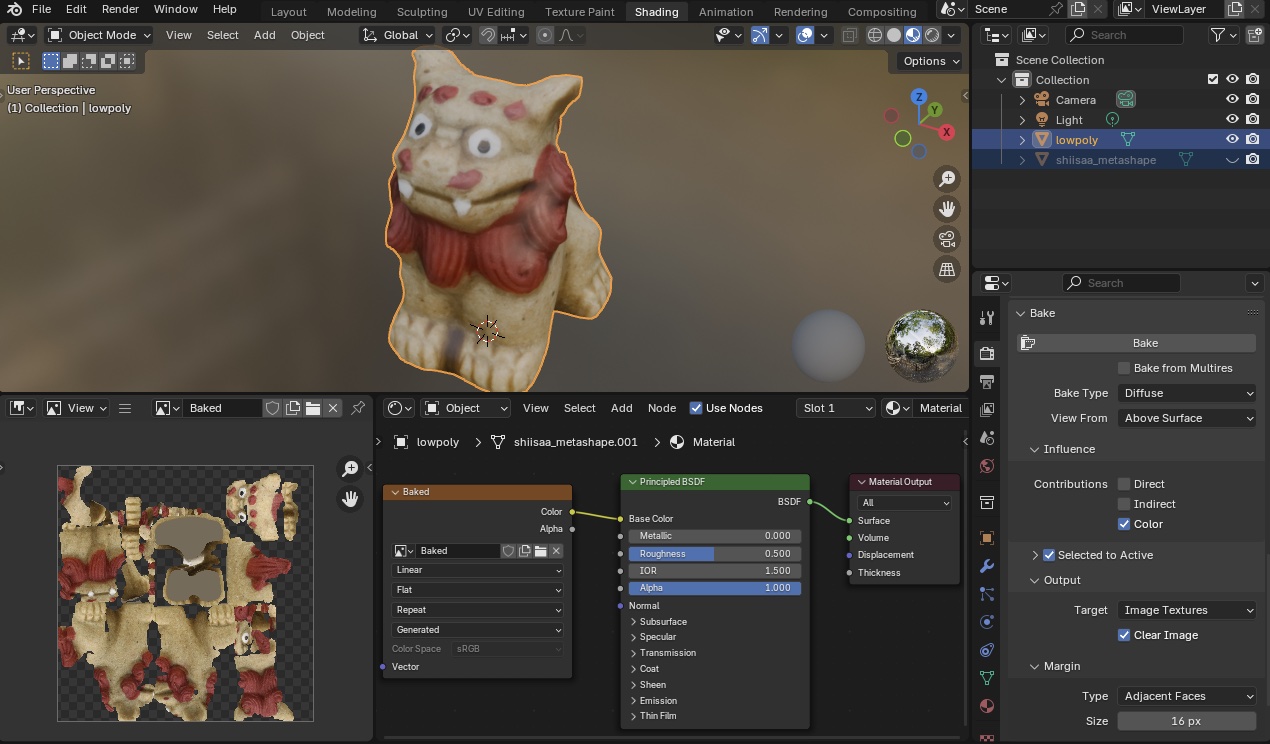
4. Texture Bake
4.1 What is Texture Bake?
When the polygon structure changes, the texture coordinate structure changes too. The original UV Map can no longer be used, so we create a new UV Map and re-project the texture onto it. This technique is called Bake. Beyond just polygon reduction, baking is also used for normal maps, bump maps, and procedural textures — anywhere baking can reduce render time.
References:
- Baking textures onto a retopologized model (Blender, JP) | STYLY
- How to bake normal maps in Blender (JP) | STYLY
4.2 Creating the Lowpoly Material
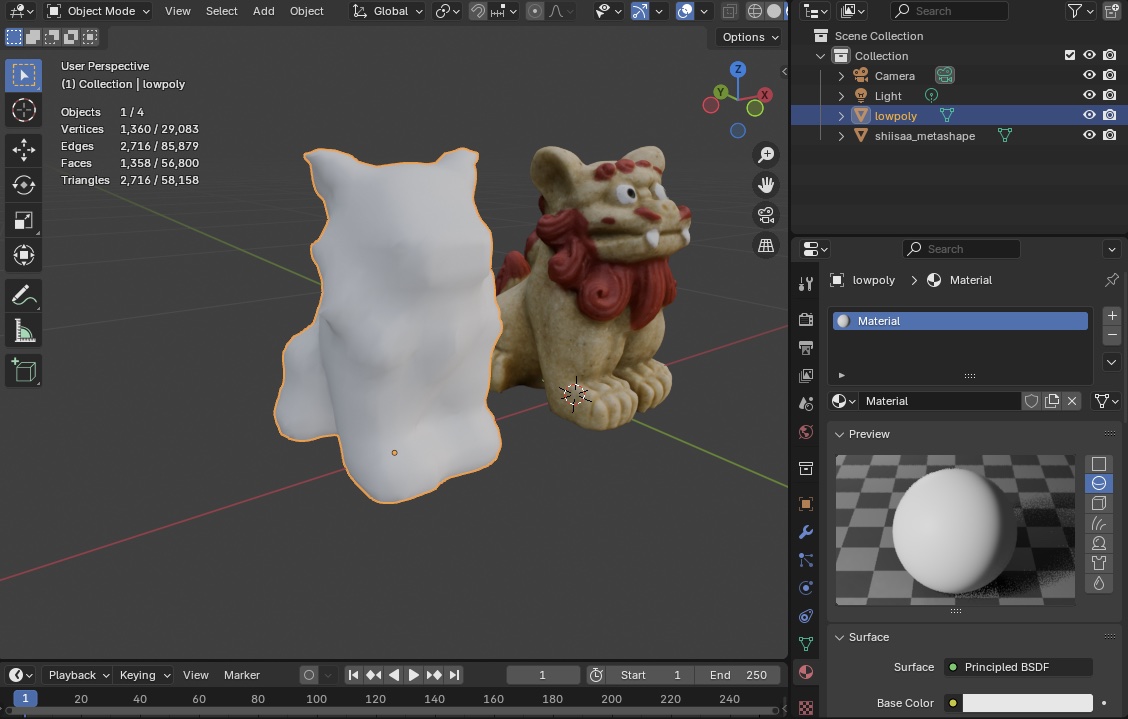
Select the lowpoly object and open the Material Properties panel.
- Unlink (× icon)
shiisaa_metashape. - Create a new material.
4.3 Creating the Lowpoly Texture Image
- Switch to the Shading workspace.
- In the Shader Editor, add an Image Texture node.
- Connect the Image Texture node’s Color socket to the Principled BSDF’s Base Color socket.
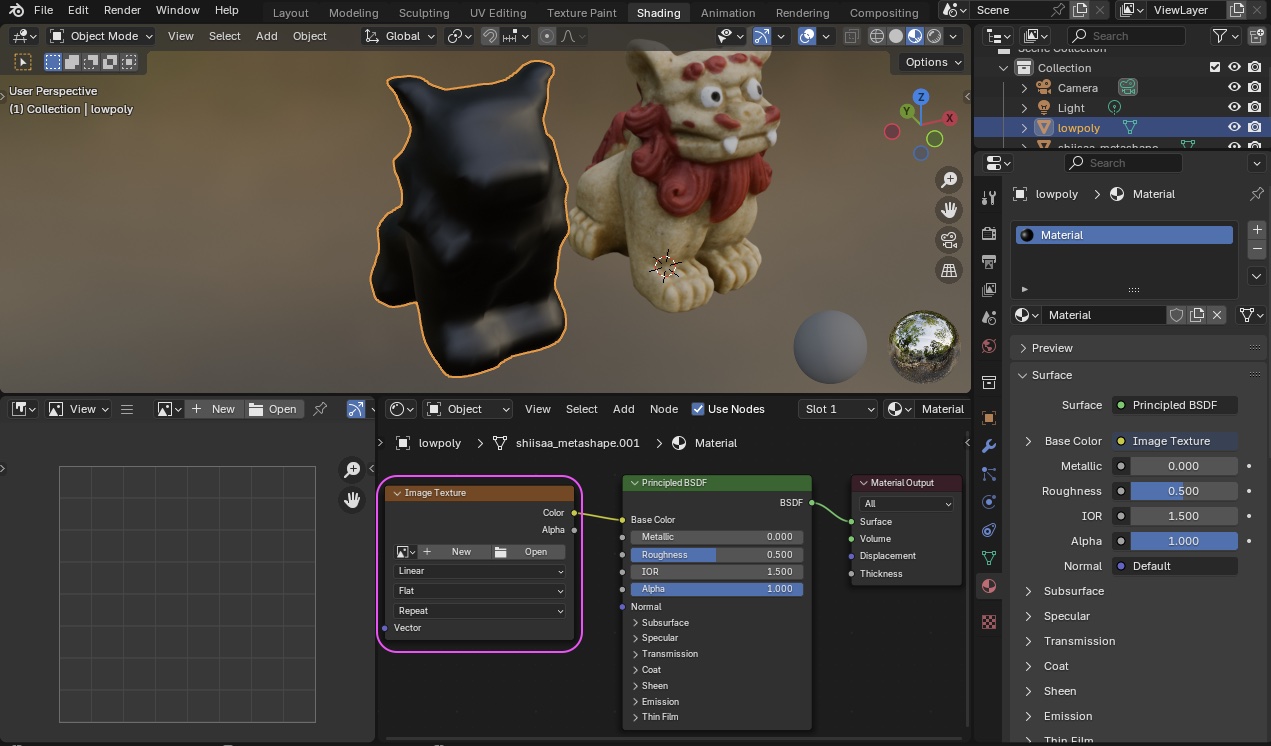
Click “New” on the Image Texture node.
- Name:
Baked - Width: 2048, Height: 2048 (higher resolution = less noise but heavier processing)
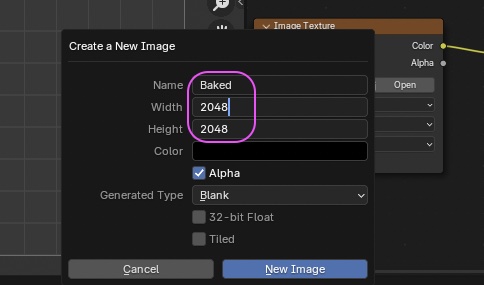
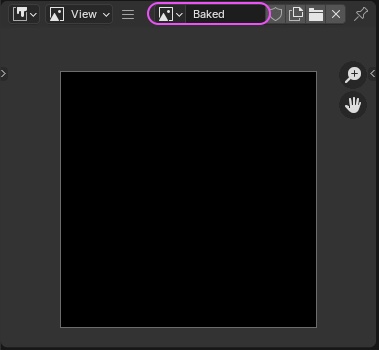
Load the just-created Baked image into the Image Editor.
4.4 Building the Lowpoly UV Map
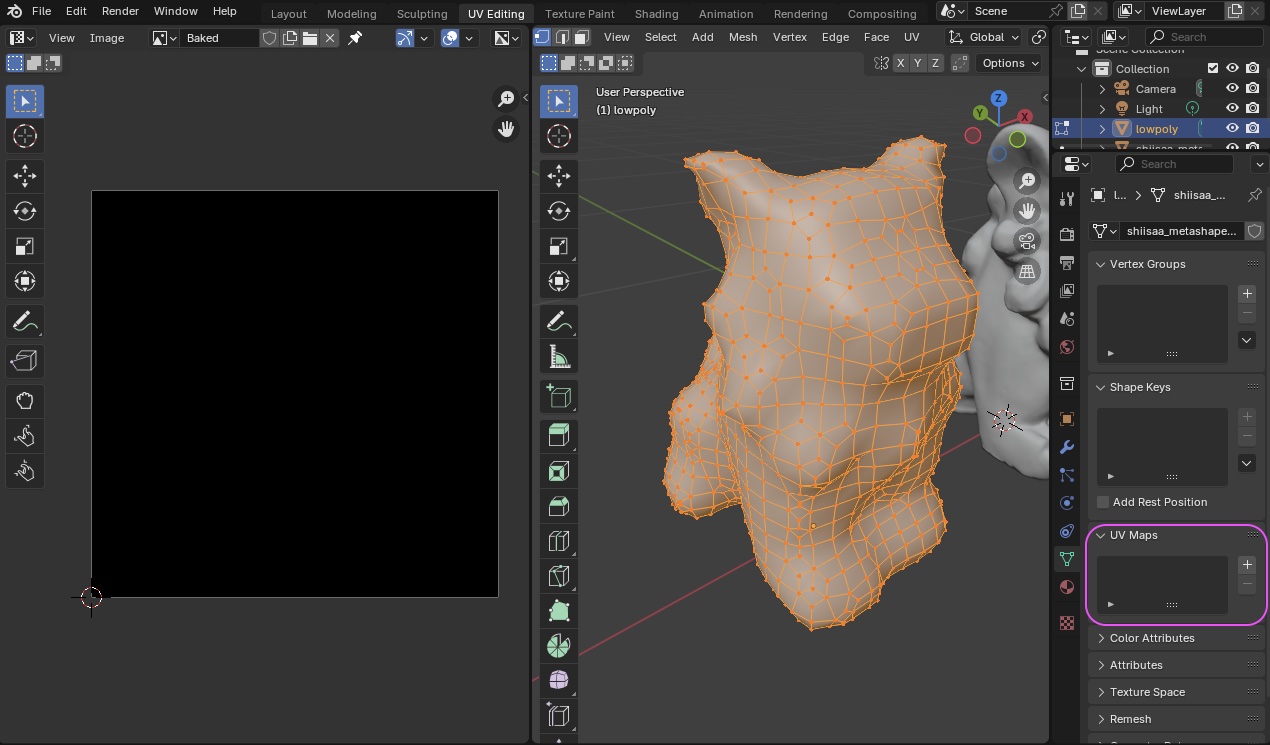
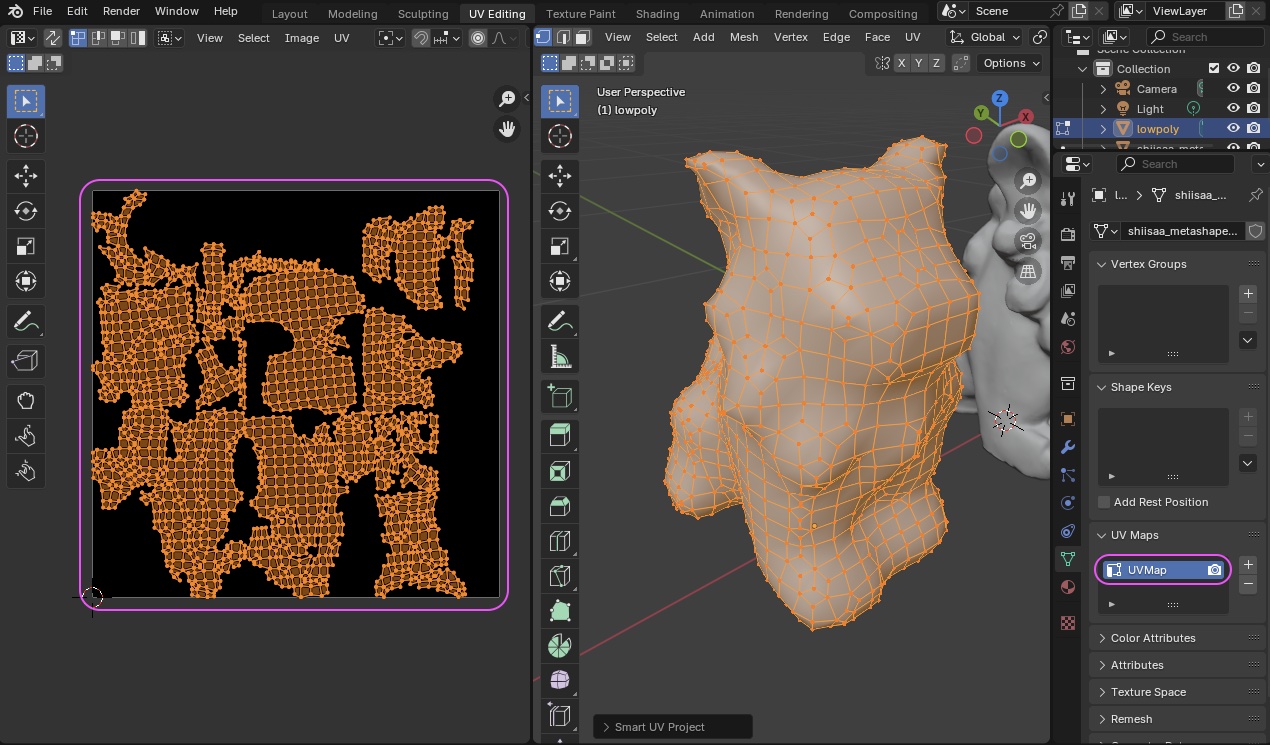
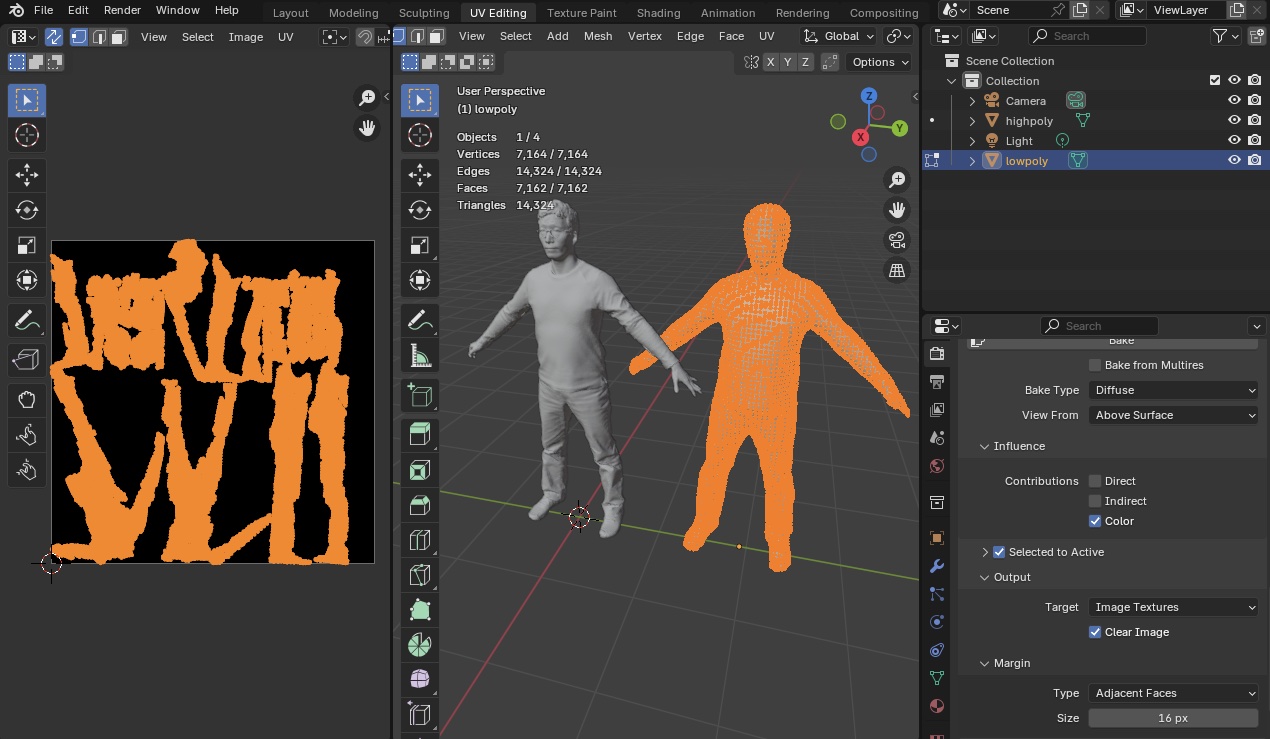
- Switch to the UV Editing workspace.
- The 3D Viewport is now in Edit Mode (see below). Press A to select all vertices.
- Load Baked into the UV Editor on the left.
- The UV Maps section at the bottom-right is empty — meaning no UV Map exists yet.
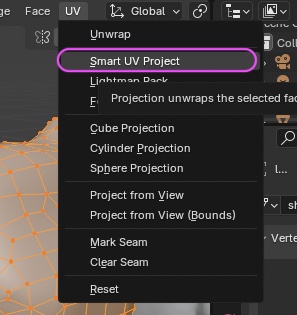
Click UV menu > Smart UV Project.
Note: Smart UV Project is well suited to mechanical structures and reportedly less suited to human bodies. Sometimes Unwrap is used instead.
In the dialog below, click Unwrap without changing anything.
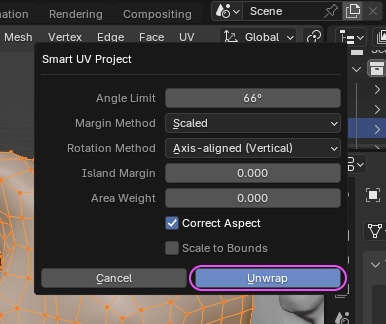
- A UV Map is created.
- Confirm that UVMap is added to the UV Maps section at the bottom-right.
4.5 Render Settings for Bake
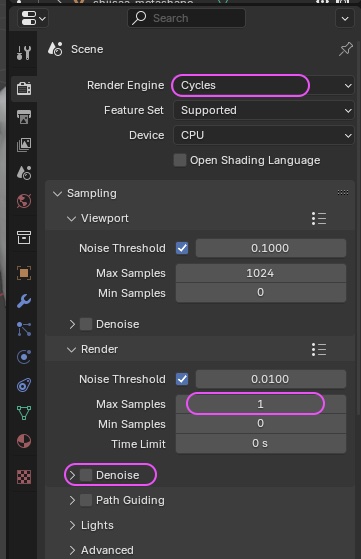
Bake requires the Cycles renderer (Eevee won’t work). Switch Render Properties > Render Engine to Cycles, and configure the following.
- Render > Max Samples: 1 (texture projection, so we keep it light).
- Note: some examples set 10. The exact quality difference is unclear.
- Render > uncheck Denoise.
- Light Path
- Total: 3
- Diffuse: 3
- Glossy: 3
- Transmission: 3
These values are based on YouTube tutorials; the precise rationale is unclear.
References:
- Light Path values: YouTube — Remesh and Optimize your 3D Scans | Blender Tutorial | Texture Baking Tutorial
- Using a Cage: YouTube — Blender Secrets - Using a Cage for Perfect Baking
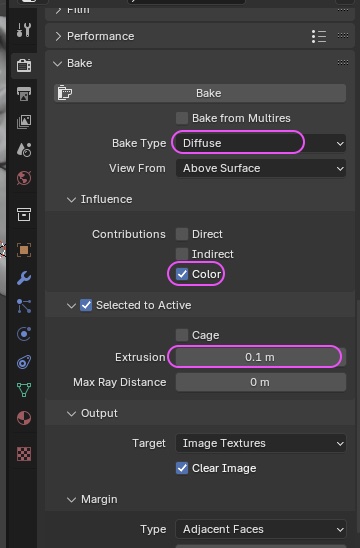
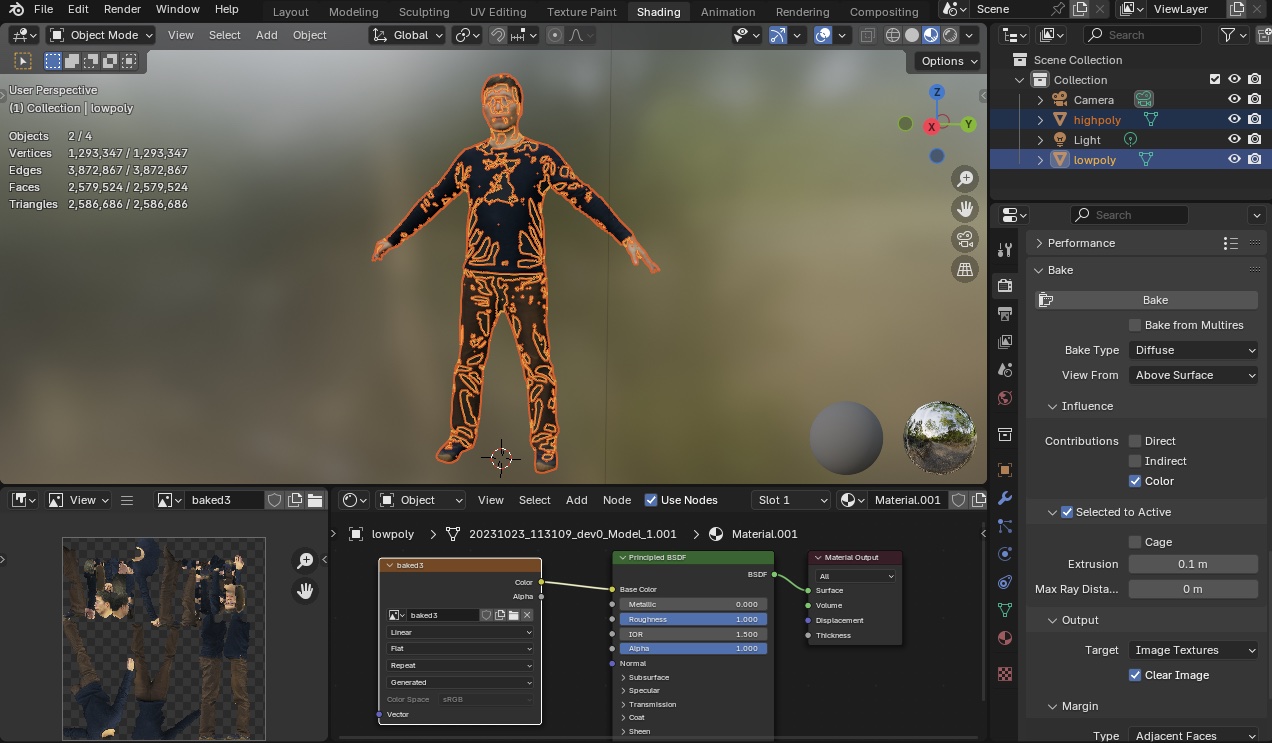
Next, configure the Bake settings.
- Bake Type: Diffuse
- Influence: enable Color only (uncheck the rest).
- Enable Selected to Active.
- Extrusion: 0.1 (around 0.01–0.1).
- The depth range over which the texture is projected from the surface.
- Needs tuning when surfaces are close together (e.g. body and arm: arm texture may project onto torso).
- If problems occur, also configure Cage.
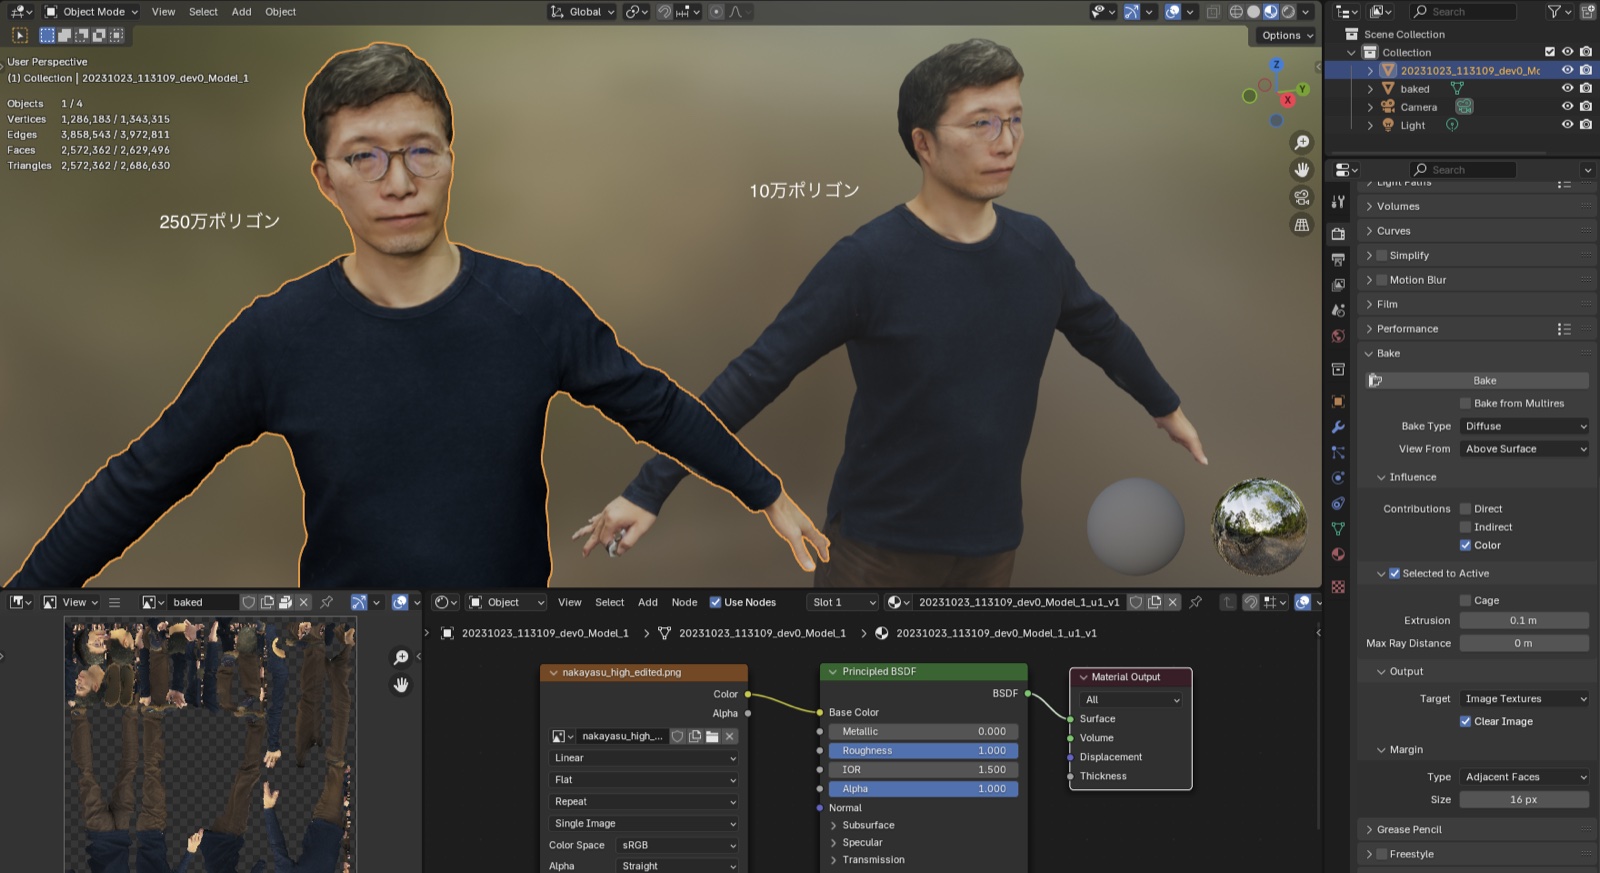
4.6 Bake
- Switch to the Shading workspace.
- Select the lowpoly object and clear its position (Option+G).
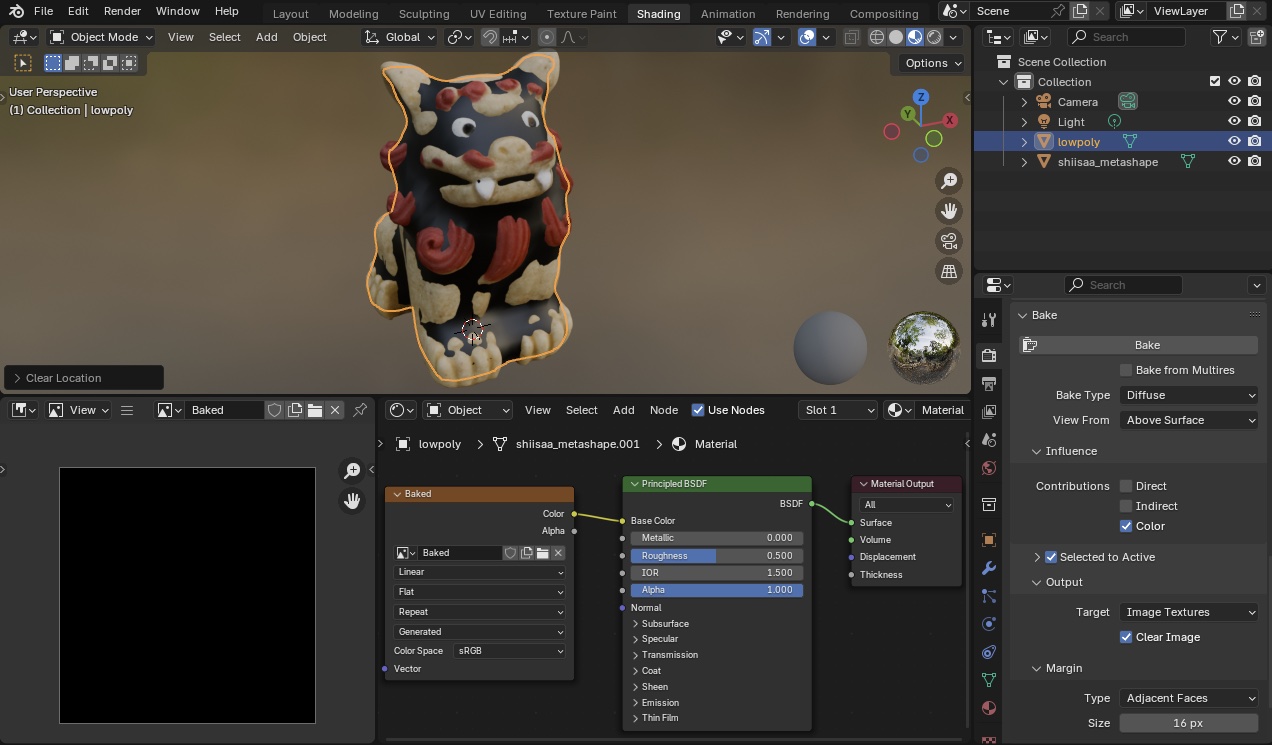
Note: some YouTube tutorials say you must have the Image Texture node selected on the lowpoly at this point, but bake works fine even without selecting it.
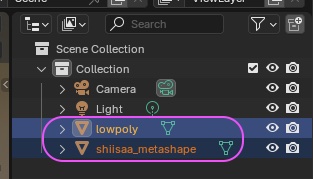
Multi-select with the lowpoly active (light orange) and shiisaa_metashape also selected.
- Method A: hold Cmd and click
shiisaa_metashape(highpoly), thenlowpoly, in that order. - Method B: hold SHIFT and click
lowpoly, thenshiisaa_metashape(highpoly), in that order (only works when they’re shown consecutively in the Outliner).
Click the Bake button.
Progress is shown as below. On a MacBook Air 2022, baking finishes in about 5 seconds.

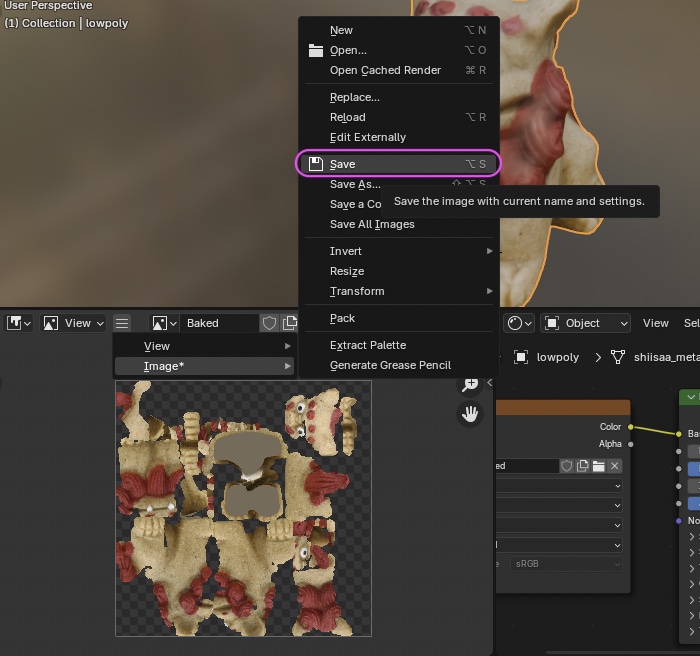
Bake completes and the lowpoly texture is generated.
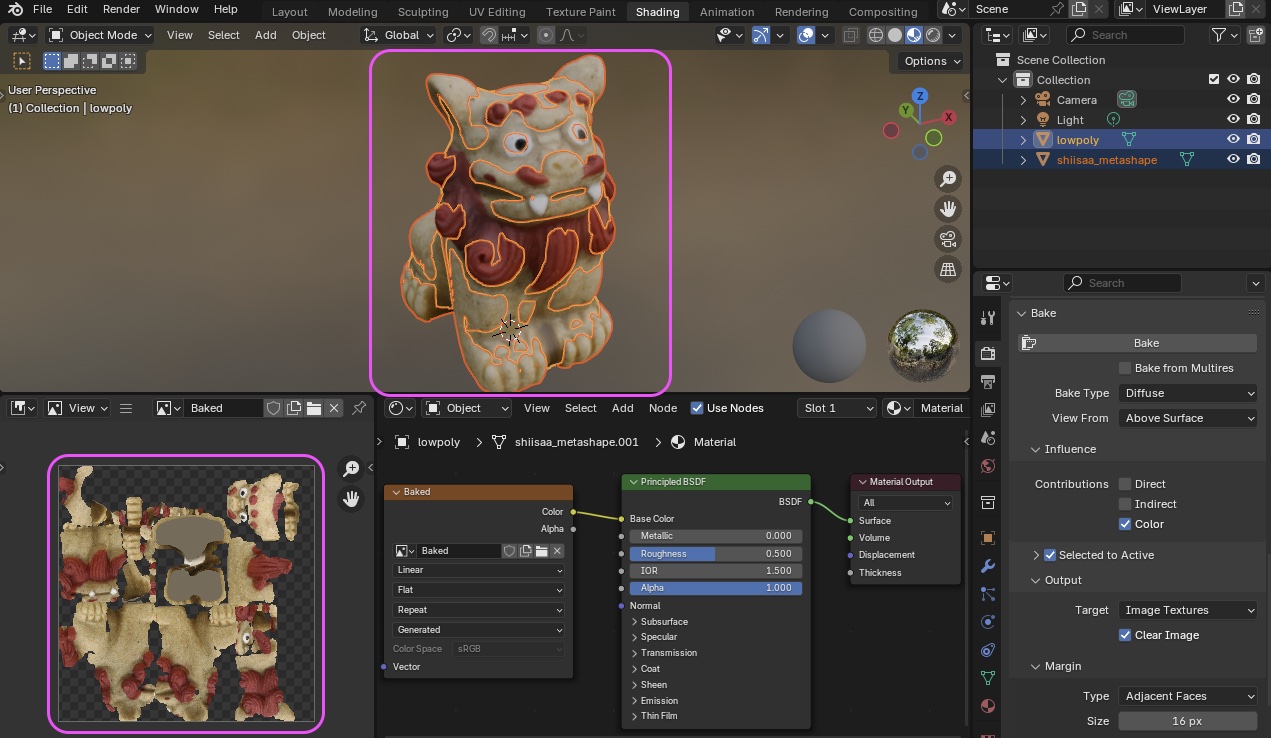
Hide shiisaa_metashape to verify. Setting Material Roughness to 1.0 removes specular highlights so you can see only the texture.
At this point the texture only exists in memory — it isn’t saved to disk yet. Save it via Image Editor > Image menu > Save — don’t forget.
If you need an OBJ export, hide the highpoly and export only the lowpoly (with its position reset).
5. Low-Poly Conversion of a Body Scan
5.1 Preparing the Body Scan (before adjustment)
If you’ve already adjusted the scan, jump to 5.5.
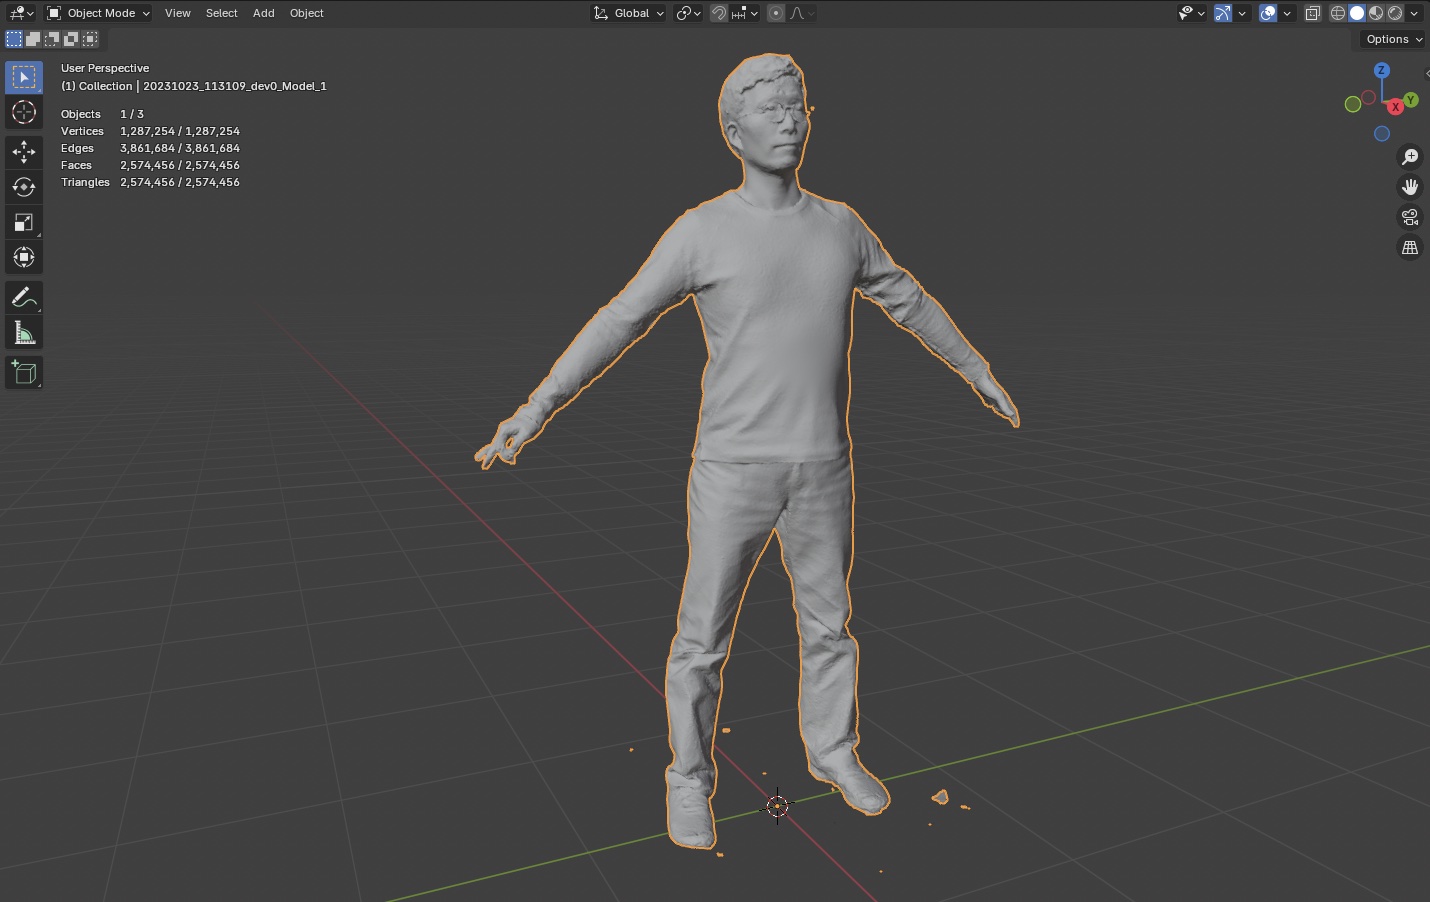
In Viewport Overlays, enable Statistics so the polygon count is visible.
5.2 Removing Unwanted Geometry
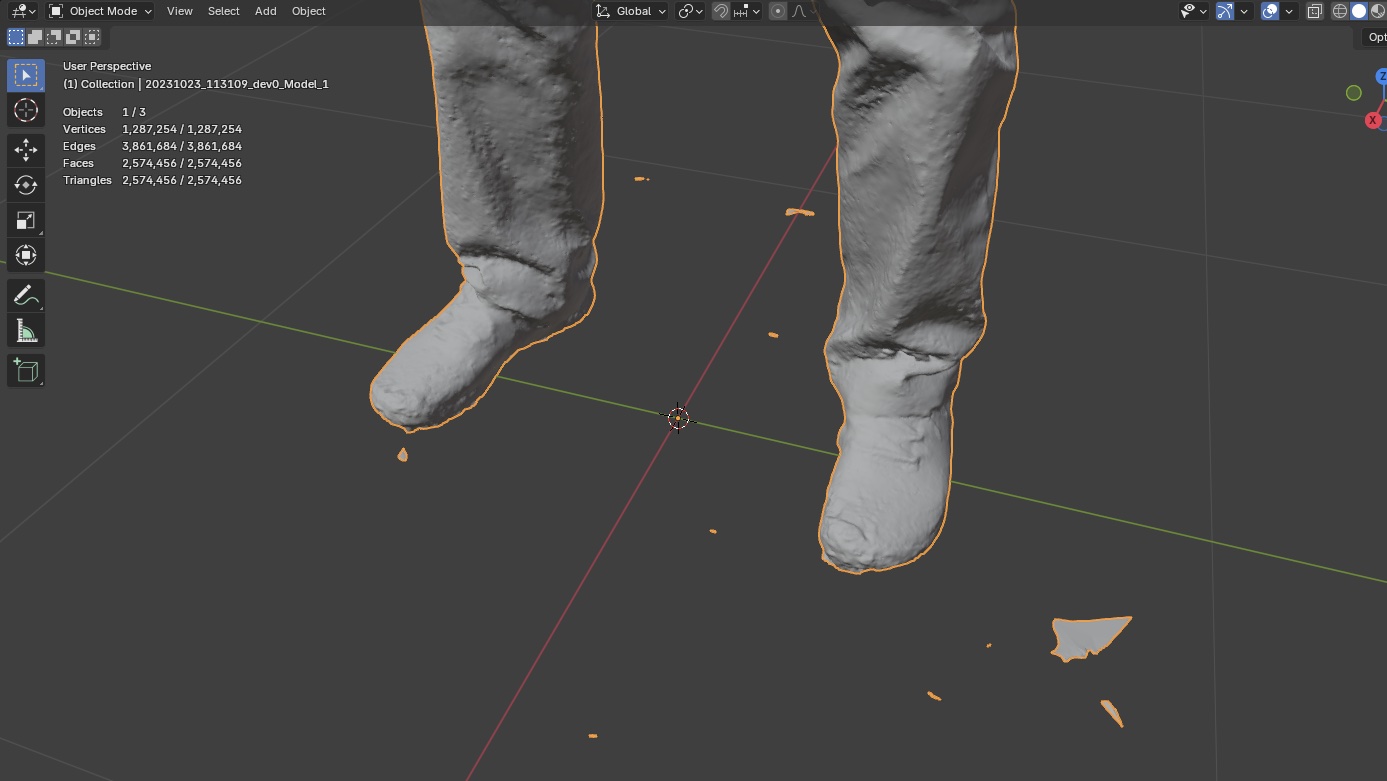
Switch to Edit Mode and X-Ray mode. Select unwanted vertices and delete them (X).
To remove only part of a needed object, use Dissolve (Cmd+X) or smooth in Sculpt mode.
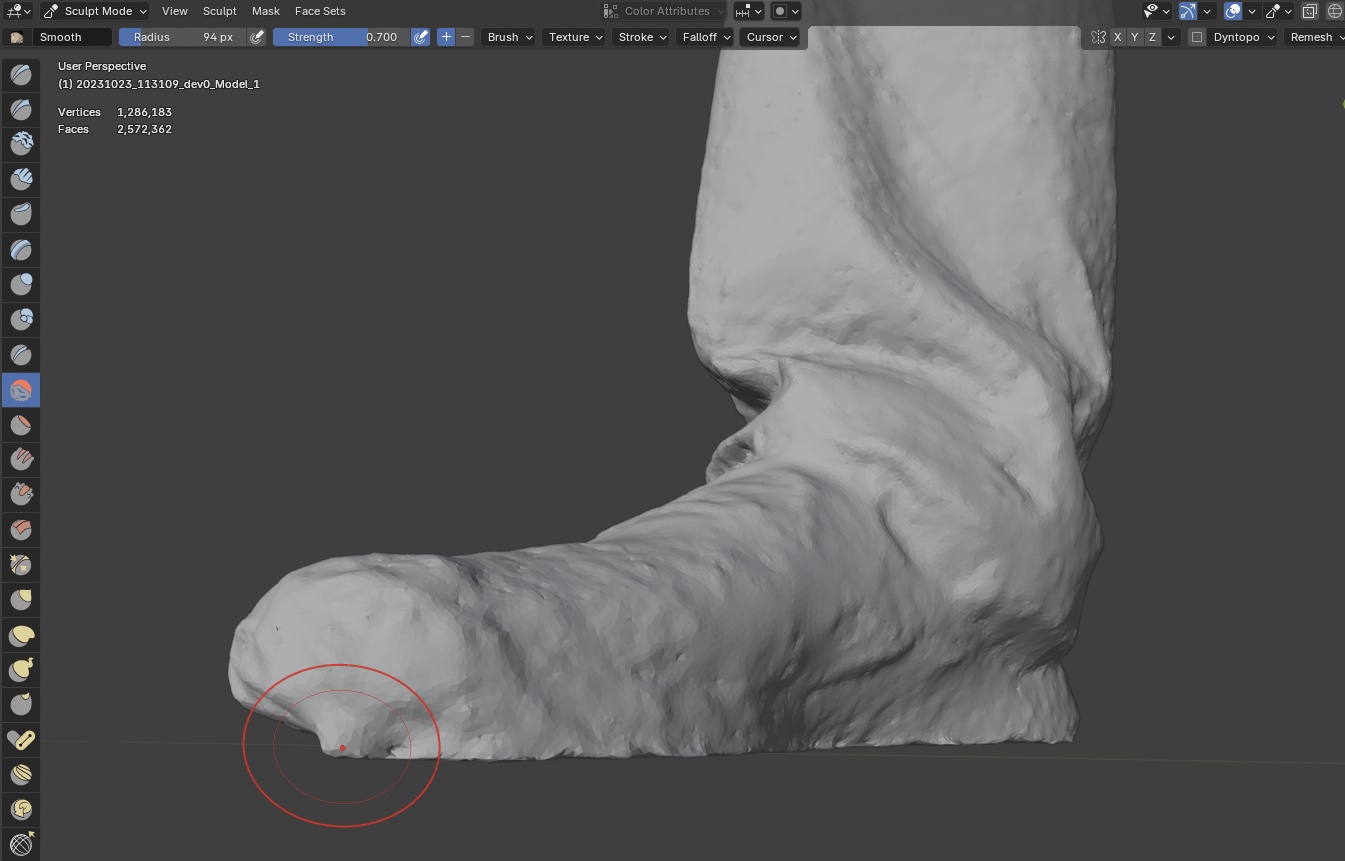
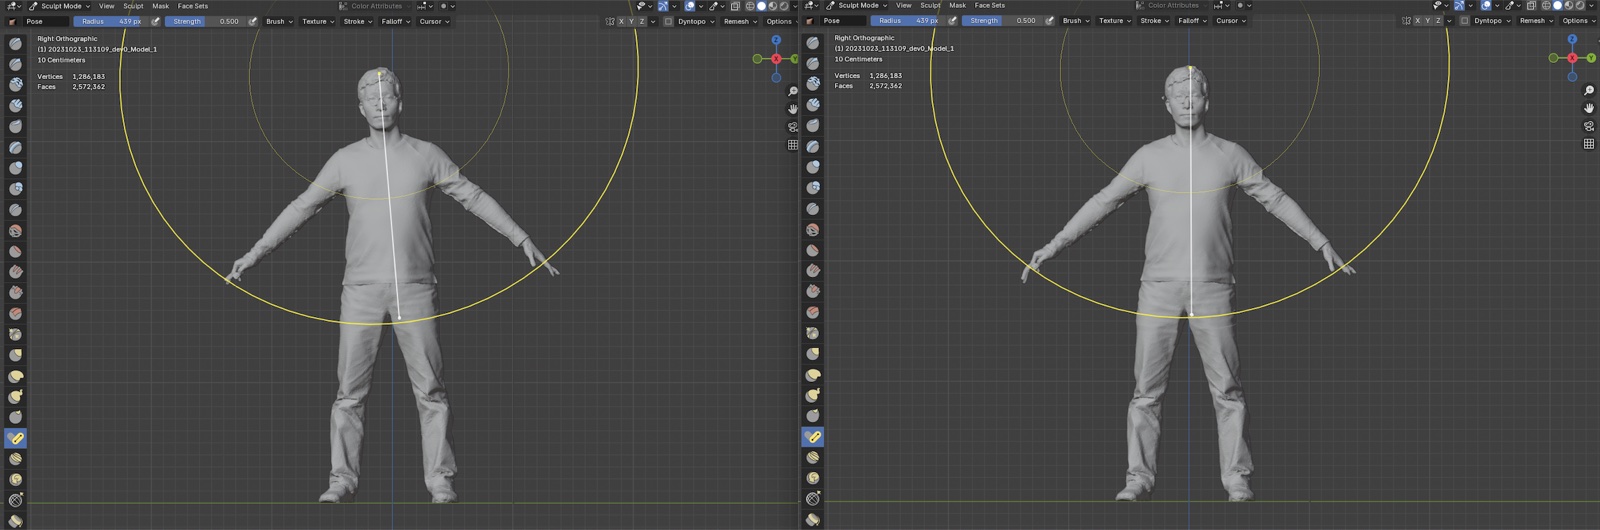
5.3 Posture Adjustment
I can see my own posture has gotten pretty bad. Since this is CG, I might as well straighten it. Adjust with the Pose tool in Sculpt mode.
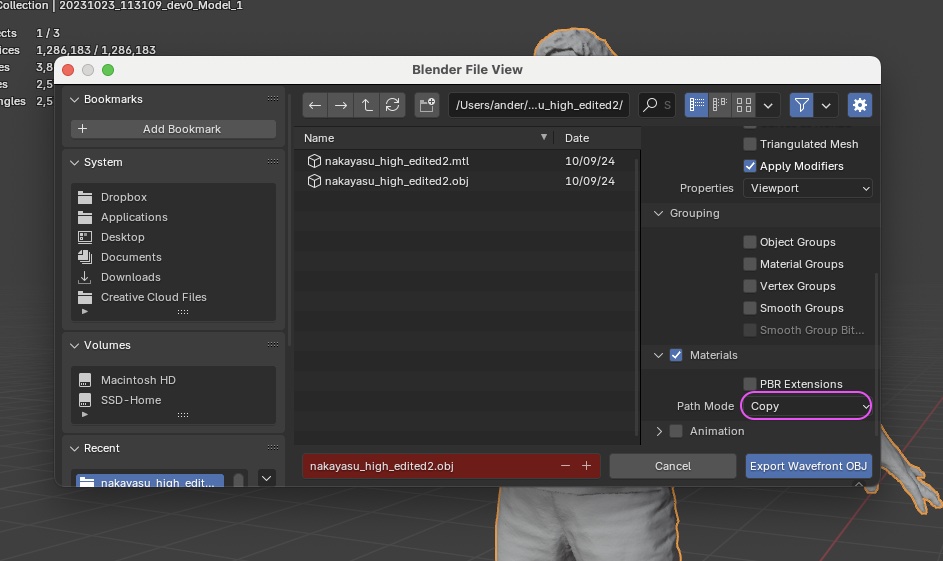
5.4 Exporting the Adjusted Data
Export the adjusted data as OBJ for use elsewhere. Set Material Path Mode to Copy.
5.5 Importing the Adjusted Model
In the Outliner, rename the highpoly model to highpoly.
The rest is the same as the Shisa workflow, so the steps are abbreviated.
5.6 Low-Poly Conversion
Use Remesh to bring the polygon count down. First, set Voxel Size so that facial features and finger shapes are still preserved. At this point the model is still around 150k+ polygons.
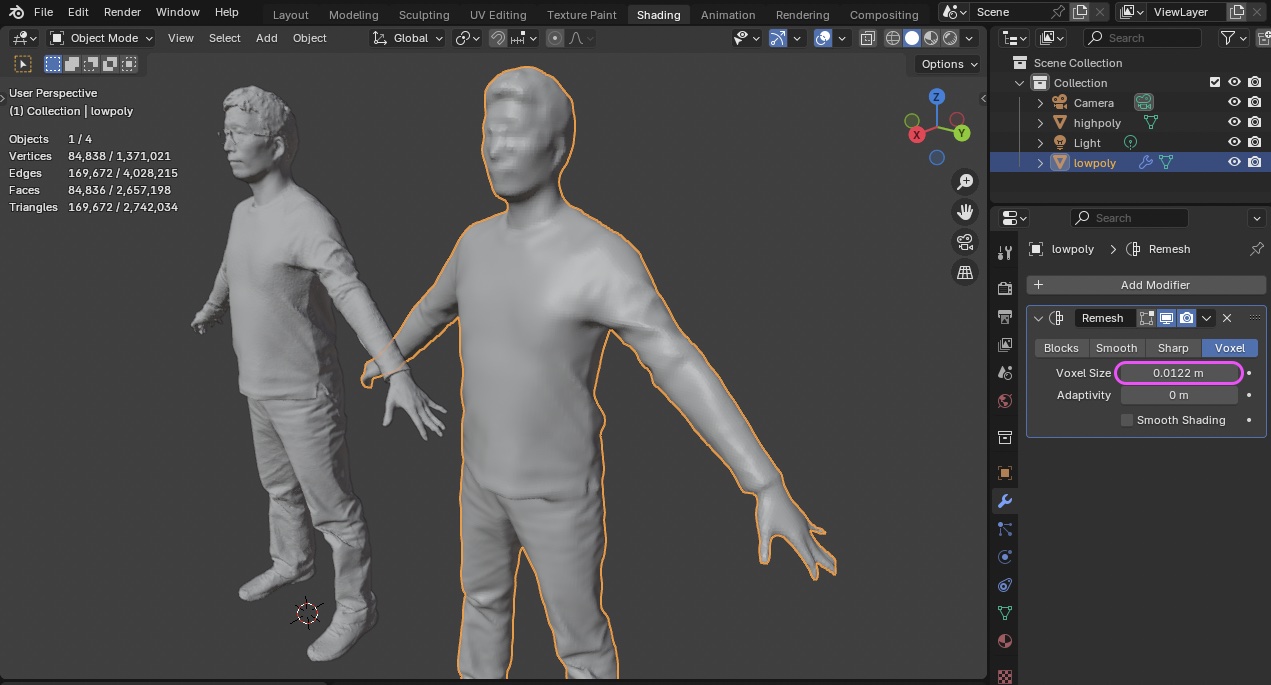
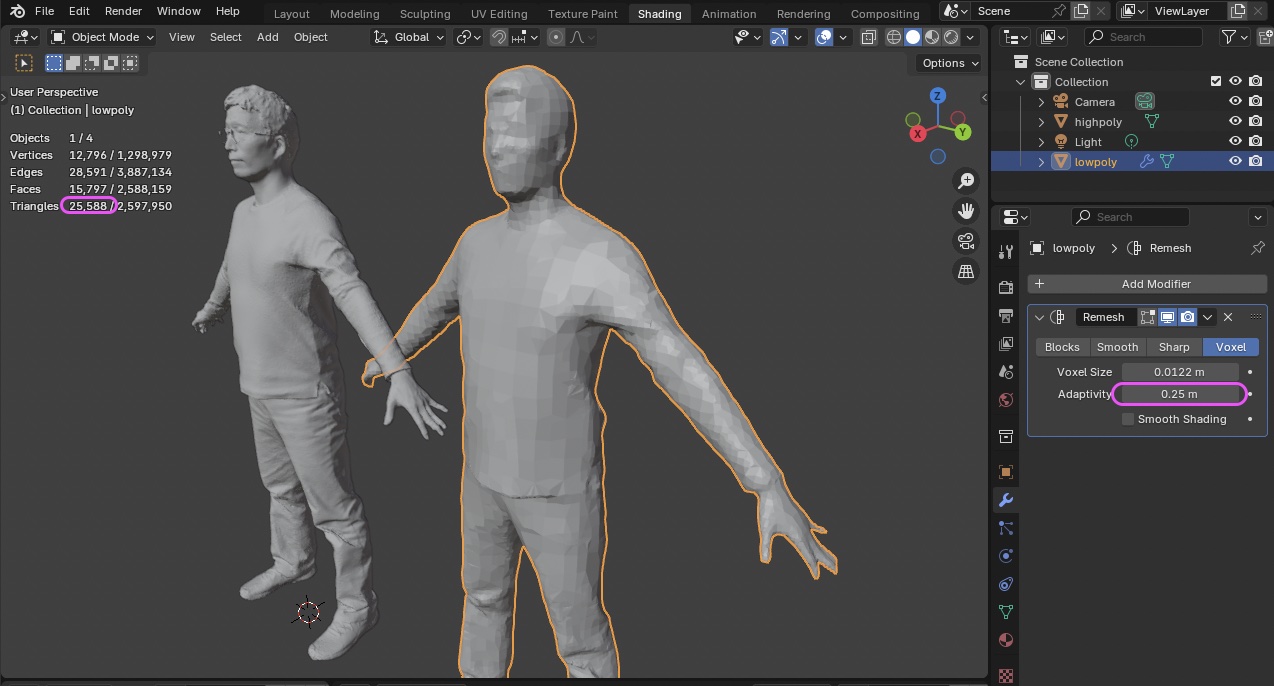
Next, adjust Adaptivity to drop the polygon count in low-detail areas while preserving high-detail areas. In the example below, the count drops to about 25,000.
- Voxel Size: 0.0122
- Adaptivity: 0.25
Polygons can break depending on the values, so don’t push Adaptivity too low.
Create the lowpoly texture image, build the UV Map, and so on.
If broken areas appear after the texture is generated, revisit the settings.
Finally, don’t forget to save the texture image. Export the lowpoly (with position reset) while the highpoly is hidden — or set the export’s Include option to Selection Only. Set Material Path Mode to Copy.