Max Basics - Part 1
Updated: 2026-05
This article was written before 2020. It is kept here as an archive — the content is outdated and some links may no longer work.
What is Cycling ‘74 Max?
Partial update 2020.6.20 (this article was originally written based on Mac Max 7 in 2017. It is being gradually updated for Windows Max 8.)
Max is a graphical programming environment developed and sold by Cycling ‘74. Unlike code-based programming environments such as Processing, Max uses node-based programming where boxes with various functions are connected by patch cords. Because the program flow is easy to understand visually, and parameters and program structure can be modified easily, Max is often used for prototyping programs that require trial and error, and for media art works. In Japan, MI7 handles distribution. The MI7 site offers extensive Japanese-language information, and registered users can also access Japanese patches and translated reference documentation.

Max specializes in video and audio synthesis, and is frequently used for live music performance and visual production. While the execution speed of C++ environments such as openFrameworks is faster, Max is superior in terms of ease of use. Thanks to faster computers, Max can now be used for live music performance and visual production without issues.
Up to version 4 the software was called Max/MSP/Jitter, but from version 5 onward it has simply been called Max (returning to the original name?). It was originally developed by Miller Puckette, and is currently developed by Cycling ‘74. Pure Data, also developed by Miller Puckette, is a similar graphical programming environment available for free, but Max is more polished and easier to use. From version 7, the runtime that was previously a separate application is now bundled, allowing Demo mode (no save, but editable). From version 8, even the one-month Trial version (full functionality including saving) requires creating an account before use. This change makes it possible to first explore features in Demo mode, and switch to the Trial version when needed.
Max Tour Tutorial
This exercise follows the Max Tour published by MI7. The video itself is only about 5 minutes long, but understanding the features it introduces requires a broad range of knowledge. The video below uses version 6, but this exercise uses version 8. (We are currently in the process of migrating the source from Mac Max 7 to Windows Max 8.) For video playback, we use the jit.movie object instead of the imovie object.
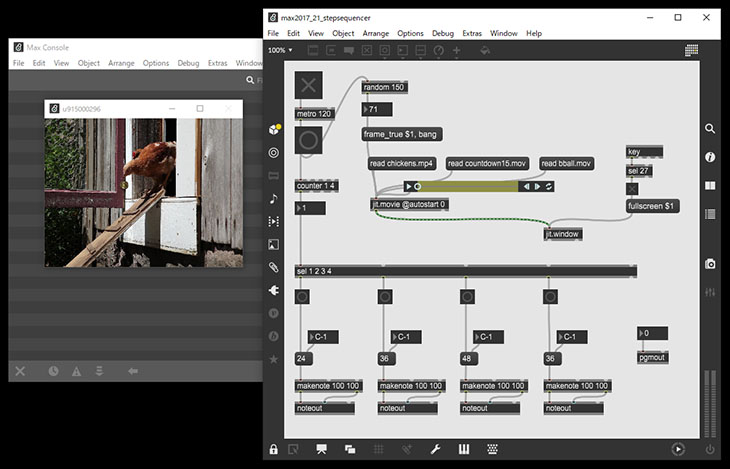
What is a Step Sequencer?
This tutorial culminates in building a step sequencer where audio and video are synchronized. A step sequencer is an automatic playback system in which sounds are entered step by step, and the sound source plays as the steps progress.
When you record performance data while playing a digital instrument in real time, this is called “real-time recording,” but a sequencer is called “uchikomi” (step input) in Japanese because notes are entered one by one.
Launching Max
Launch Max.
The console window (below) is displayed.
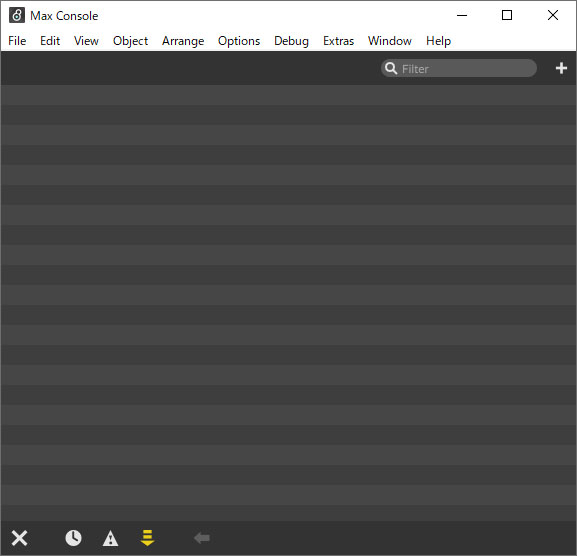
The console window displays the program’s running state as text and is also used for debugging. If a patcher window is displayed, it can be closed without issue.
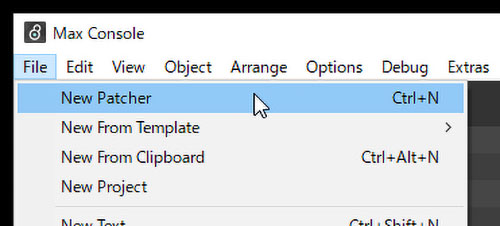
Creating a New Patcher
① Click New Patcher in the File menu
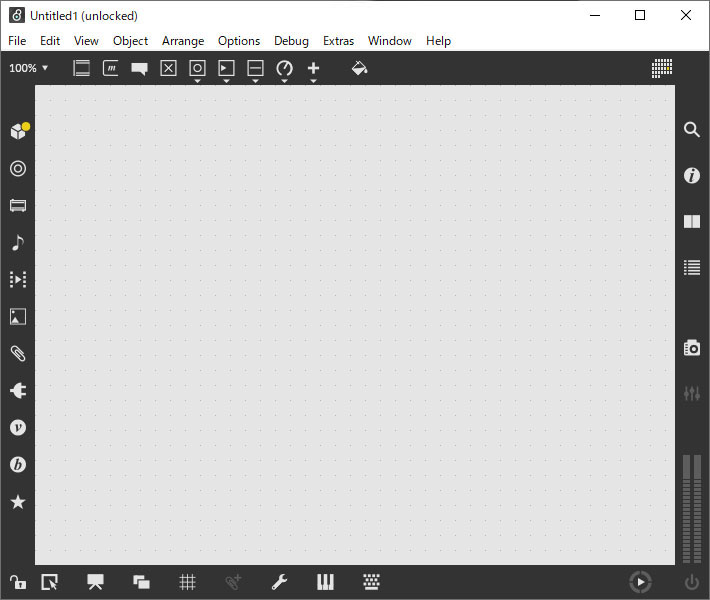
In Max, the window where programming takes place is called the patcher window (or patch window). The program itself is called a patch (or patcher).
② The Patcher Window
When you create a new patcher, an empty patcher window is displayed.
Using the Patcher Window
① Patcher Window UI
The patcher window has toolbars surrounding it.

② Max Programming Conventions
In Max, you place various objects (over 700 functions) from the top toolbar as shown below, and connect them with patch cords to build a program.
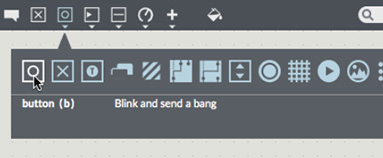
button and Patch Cord Connections
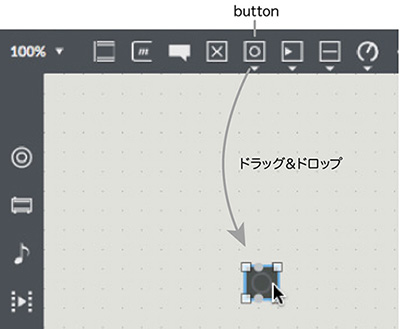
① Adding a button
Drag and drop the icon below to add it.
Icons with a small white triangle below them open a submenu when clicked, allowing you to select other objects.
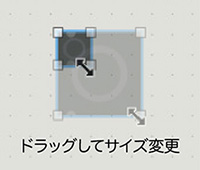
② Resizing
You can resize an object by dragging the white square handles at its four corners.
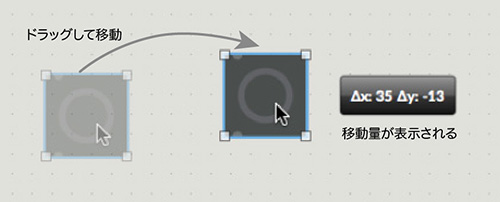
③ Move and Duplicate
Drag an object to move it. Hold the OPTION key while dragging to duplicate it. This kind of operation is similar to Adobe Illustrator. Duplication is also possible with the keyboard shortcuts Command + C (copy) and Command + V (paste).
④ Inlets and Outlets
Every object has inlets (for receiving) and outlets (for sending) for exchanging messages. By connecting these inlets and outlets, objects exchange messages with each other to build a program.
Some objects have multiple inlets and outlets depending on their type. Because the messages that can be sent and received through outlets and inlets are determined by the object, some combinations cannot be connected. You need to consult the help documentation as you work.
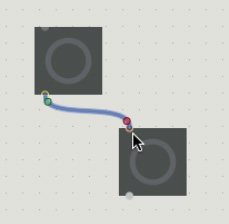
⑤ Connecting Patch Cords
Connect a button’s outlet to another object’s inlet. You can drag from either the outlet or inlet to draw a patch cord. Alternatively, click the outlet (or inlet) of the first object and then click the inlet (or outlet) of the second object.
⑥ Deleting Objects and Selecting Multiple Objects
Left-click an object to select it, then press the DELETE key. To select multiple objects, drag a selection rectangle with the left mouse button. You can also move and duplicate multiple objects.
⑦ Deleting Patch Cords
Left-click a patch cord to select it, then press the DELETE key.
To select multiple patch cords, hold the Alt (Option) key while drag-selecting.
Locking the Patcher Window
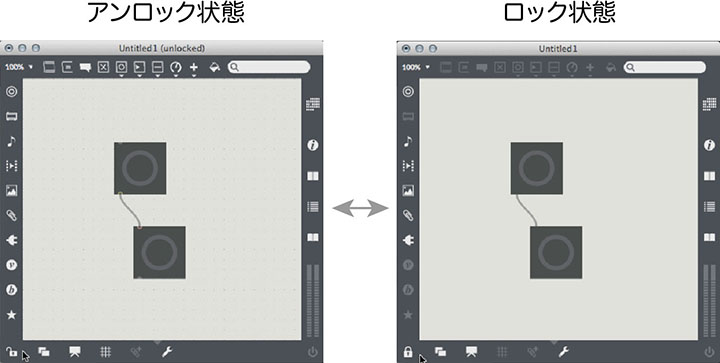
① Lock/Unlock
To test how a patch behaves, you need to lock the patcher window. As shown below, you can toggle lock/unlock by clicking the lock icon at the bottom-left of the patcher window. Alternatively, hold Ctrl (Command) and click an empty area of the patcher window. The keyboard shortcut Ctrl (Command) + E also toggles lock/unlock.
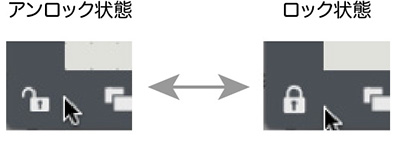
Note that locked and unlocked states look very similar, as shown below. Confirm the lock icon’s state, or check whether “unlocked” is shown in the top bar.
② Verifying Patch Behavior
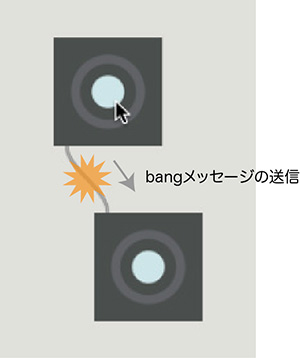
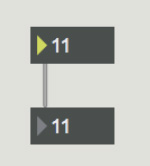
With the patcher window locked, clicking the upper button makes it light up while sending a bang message to the lower button, which then also lights up. In this way, different objects can exchange messages through patch cords. button can only send the bang message, but other objects can send numbers, strings, and so on — it depends on the object. See help for details.
③ Another Way to Test Behavior
Another way to test patch behavior, even without locking, is to operate the object while holding the Ctrl (Command) key.
Saving a Patch
Save a patch via the File menu’s Save command. Saved files have the .maxpat extension. Programming software like Max can be unstable and may crash unexpectedly, so it is recommended to save during work.
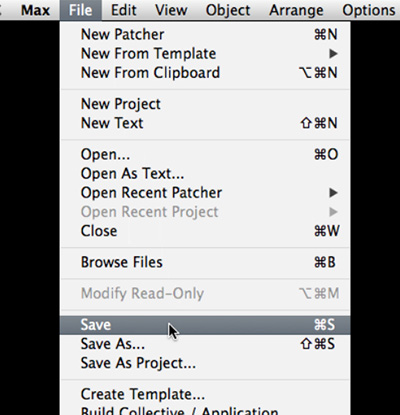
While Max supports Japanese filenames, English names are safer when sharing with other applications or English-speaking collaborators. It is also a good idea to add sequence numbers to filenames for version control, so you can roll back partway through the work.
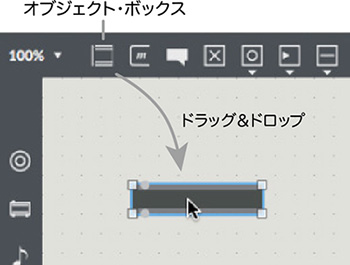
Object Box
① Adding an Object Box
Click the object box icon below or drag-and-drop it to add one. Alternatively, double-click an empty area of the patcher window. The keyboard shortcut is the N key.
② Entering an Object Name
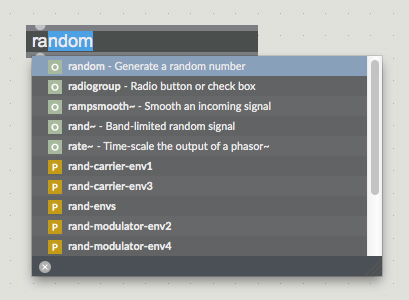
Unlike button, an object box does nothing just by being added. As shown below, a cursor blinks inside the object box; type the object name there. Only after entering an object name does it function as a specific kind of object. The object box can be thought of as a generic object.

When entering an object name, you don’t need to type all the characters — Max will suggest matching object names as shown below, allowing efficient input. Object names are entered in single-byte alphanumeric characters. Press Return to confirm.
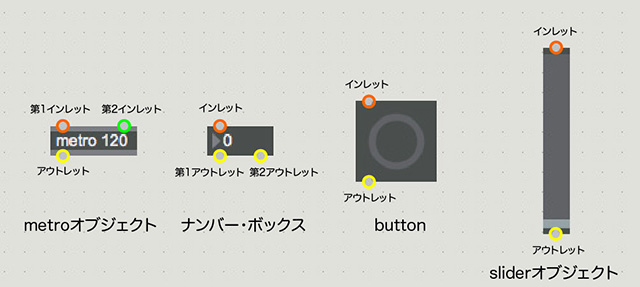
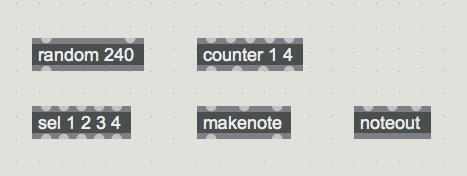
There are over 700 types of objects with various functions. The figure below shows the ones used in this tutorial.
By the way, the button object can also be created by typing “button” into an object box.
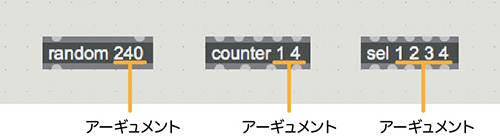
② About Arguments
The numbers after the object name are called arguments and act as parameters for the object. Some objects take multiple arguments. Use spaces between the object name and arguments, and between arguments. Depending on the arguments specified, some objects will change the number of inlets or outlets.
③ Renaming, Undo, Redo
Renaming: To change a confirmed object name, double-click the object.
Undo: Ctrl (Command) + Z
Redo: Ctrl (Command) + Shift + Z
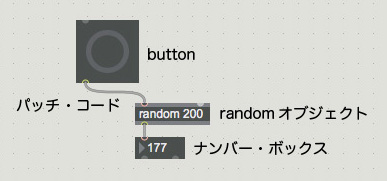
random Object and Number Box
① random Object
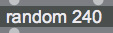
For the random object, type “random” into an object box. The argument represents the maximum value of the output number. Each time a bang is received at the first inlet, the random object outputs a random number from 0 up to (but not including) the argument.
② Number Box
The number box is an input/output interface for integers. It displays integers received at its inlet, and you can also output values from its outlet by dragging with the mouse or typing a number.
③ Testing random and Number Box
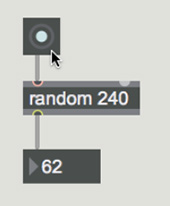
Connect the objects as shown below, then lock the patcher window. Click the button and confirm that random numbers are displayed in the number box.
counter Object
① counter Object Explanation
The counter object increments or decrements a number from its first outlet each time it receives a bang at its first inlet. Its behavior changes depending on the arguments.
No arguments
Each time a bang is received at the first inlet, an incrementing value (starting from 0) is output from the first outlet.

Two arguments
The first argument is the minimum value, and the second argument is the maximum value. Each time a bang is received at the first inlet, the value increments by 1 from the minimum value, and wraps back to the minimum after reaching the maximum.

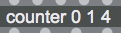
Three arguments (first argument = 0)
Behaves the same as the two-argument case.
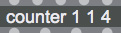
Three arguments (first argument = 1)
The first argument is the minimum value, and the second is the maximum. Each time a bang is received at the first inlet, the value decrements by 1 starting from the maximum value, and wraps back to the maximum after reaching the minimum.
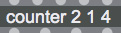
Three arguments (first argument = 2)
The first argument is the minimum, and the second is the maximum. Each time a bang is received at the first inlet, the value increments by 1 from the minimum, then ping-pongs — decrementing after reaching the maximum and incrementing again after reaching the minimum.
In this way, you can have an object behave in many different ways depending on its arguments. Argument specification and its effects vary by object, so consult the help documentation as you work.
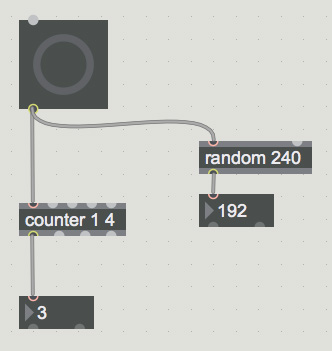
② Testing the counter Object
Connect as shown below and verify that the number in the number box increments each time you press the button.
metro Object and toggle
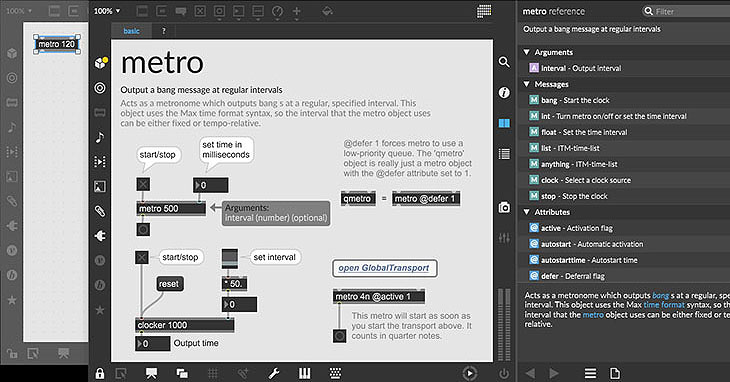
① metro Object
The metro object outputs a bang from its outlet at the interval specified by its argument. The unit is ms (milliseconds, 1/1000 of a second). To turn its operation on or off, send 1 or 0 to its inlet. The setting below produces a bang every 120 ms.

② toggle
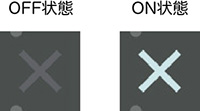
The toggle object acts as a switch for objects like metro that continue running once turned on. Clicking it toggles between ON and OFF, and it outputs 1 or 0 from its outlet.
③ Testing metro and toggle
Combining metro and toggle enables automatic patch control.

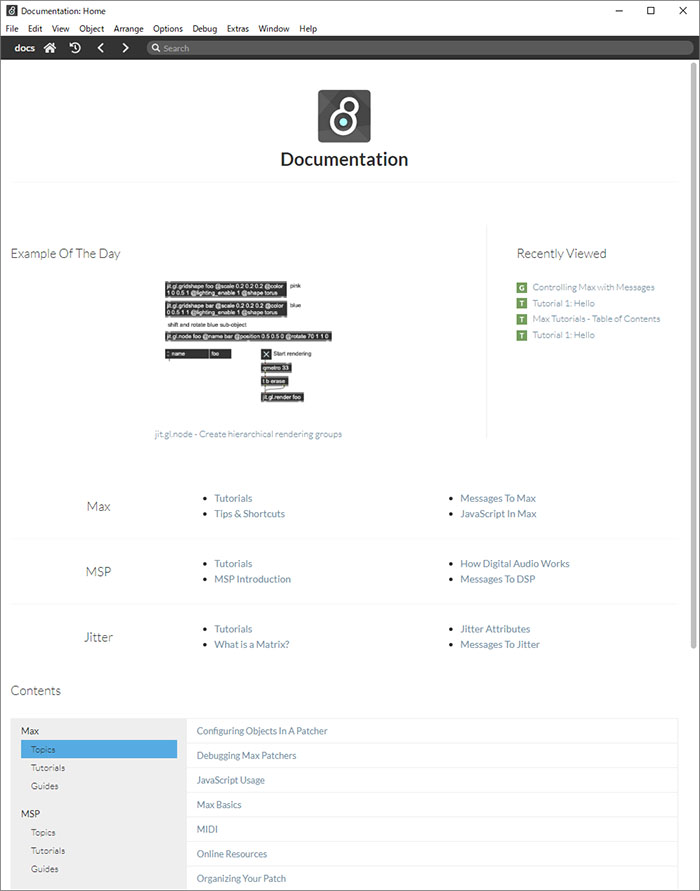
Help and Various Documentation
① Displaying Help
Hold OPTION or ALT and left-click an object to display its help. Max’s help is excellent — not only does it explain, but you can run the example interactively. You can also copy objects from the help into your own patch.
② Various Documentation
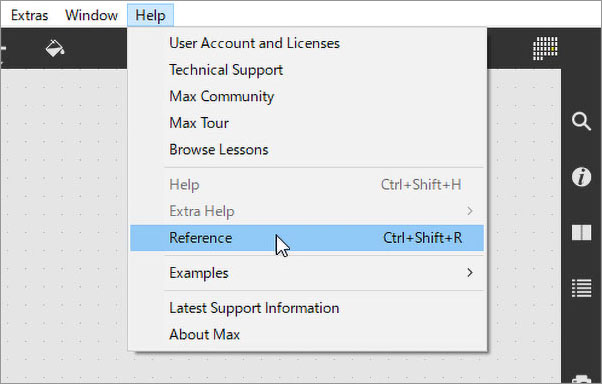
Many useful documents are accessible from the Help menu. You can self-study just by working through these:
- Max Tour — beginner-oriented tour
- Browse Lessons — lesson-style learning content
- Reference — searchable reference, also includes many tutorials
- Example — sample patches that you can use directly
The figure below shows the Reference window. Various content such as Tutorials is provided at the bottom.