Photogrammetry Introduction
Updated: 2026-05*
This article was written before 2020. It is kept here as an archive — the content is outdated and some links may no longer work.
What is Photogrammetry?
Photogrammetry is a technology that generates 3D models based on photographs taken from various angles. Although the technology has a long history, it has recently garnered attention because improvements in photogrammetry software and computer performance now make it possible to generate high-quality 3D models even from images captured with digital SLR cameras or personal smartphones. It can scan objects ranging from small items, such as figurines, to large-scale structures like buildings, and its applications are expanding into a wide variety of fields.

One method of 3D scanning (digitization) involves using a system with multiple cameras and sensors set up in a studio; however, since the object to be scanned must be brought into the studio, this approach has traditionally been limited to specialized applications due to size constraints and the high level of technical expertise required. In contrast, photogrammetry allows for 3D scanning with just a camera, which is why its user base is expanding among the general public.Furthermore, in harsh environments such as caves and archaeological sites, using only a camera minimizes the burden of equipment. By employing drones for photography, it is now possible to create 3D models of massive structures and urban spaces—a feat that was previously impossible.
by Spogna
on Sketchfab
The History of Photogrammetry Photogrammetry is a method for deriving the geometric characteristics of objects from photographic images, and historically, it has developed as a topographic surveying technique. Measuring the position of a point or the distance between points is a fundamental technology that underpins human economic activity, and its history dates back to the construction of the pyramids in ancient Egypt. The history of photogrammetry is also long, dating back to the 19th century, the same era as the advent of photography.The technology for creating maps from aerial photographs was also highly valued for military purposes. Since then, global surveying systems have continued to evolve, with the advent of GPS (Global Positioning System) surveying using satellites, as well as the emergence of Google Maps, which integrates satellite imagery and maps. Photogrammetry, which is introduced here as a scanning technology for measuring the three-dimensional shapes of objects, is one of the evolved forms of topographic surveying technology.
Examples of VR Works Using Photogrammetry
Applications in Gaming
The Growing Number of High-Quality Projects Visible on SketchFab

Sketchfab is a website where users can share and publish various types of 3D data. It also allows for paid sales. Users can not only download models for use in their own projects but also access the Sketchfab website via a VR headset to view 3D objects in a virtual reality environment. The number of high-quality photogrammetry projects is on the rise. Photogrammetry is increasingly replacing traditional modeling, which involves creating models from scratch.
by roxyjungle
on Sketchfab
Franciscan Monastery and Basilica
by NANO
on Sketchfab
Workflow
Photogrammetry Software
There are many different types of photogrammetry software. Here are a few examples. You can compare the features of photogrammetry software at the URL below.
https://en.wikipedia.org/wiki/Comparison_of_photogrammetry_software
Agisoft Metashape
Photogrammetry software developed and sold by Agisoft. It is available in Professional and Standard editions, with educational versions offered at half price. Compatible with Windows, Mac, and Linux.
Used in these lecture notes. The distributor in Japan is Oak Co., Ltd. Detailed information, including usage instructions and techniques, is available in Japanese on Oak’s website. https://oakcorp.net/agisoft/

3DF Zephyr
Photogrammetry software for Windows developed and sold by 3DF Flow. It is available in four versions: Free, Lite, Pro, and Aerial. Although the Free version has limited functionality, it can process up to 50 photos. Please note that the Lite trial version is different from the Free version.

3DF Zephyr Free Version Page: https://www.3dflow.net/3df-zephyr-free/
RealityCapture

Although the name can be confusing, this is RealityCapture, the photogrammetry software from CapturingReality. While it has a strong reputation for analysis accuracy, it is expensive compared to other options. PGM, ENT, and CLI offer a range of options to accommodate user needs, including monthly or annual subscriptions, perpetual licenses, and PPI services where users pay based on the number of points processed.
https://www.capturingreality.com
Autodesk ReCap Pro

Photogrammetry software for Windows developed and sold by Autodesk. Students and faculty members can create an Autodesk account to use the academic version (free of charge).
https://www.autodesk.co.jp/products/recap/overview
Comparison of Software Accuracy
Compare: Metashape / RealityCapture / 3DF Zephyr
by jurand m
on Sketchfab
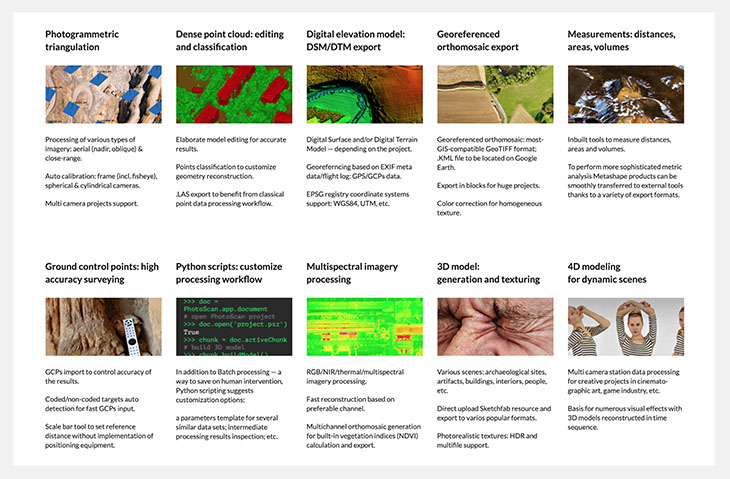
Various Photogrammetry Techniques
Photogrammetry software offers a wide range of features, and I believe that applying them can open up a variety of creative possibilities. (Currently studying this)
https://www.agisoft.com/features/professional-edition/
Installing and Launching Metashape
1. Download the installer
Download the Mac version (Metashape Standard 1.5.3 as of July 2019) from the link below.
https://oakcorp.net/agisoft/standard/
2. Installation
Double-click the downloaded DMG file.
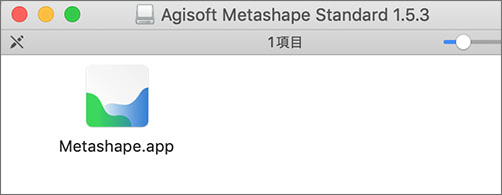
Click “Agree” on the license agreement screen. The Agisoft Metashape Standard 1.5.3 drive will be mounted.

In 1107, students cannot access the Applications folder for administrative reasons, so drag and drop Metashape.app (see below) into the Apps folder you have already created on your desktop to use it.
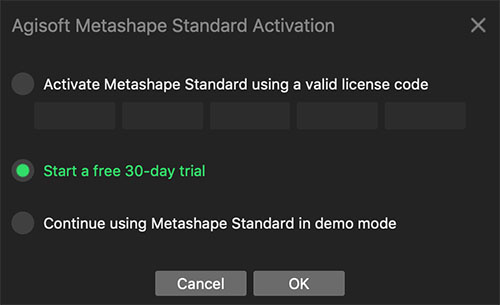
③ Launch the 30-day trial version
Select “Start a free 30-day trial” and click the OK button.
*Exporting is not available in demo mode.
Task 1: Taking Photos
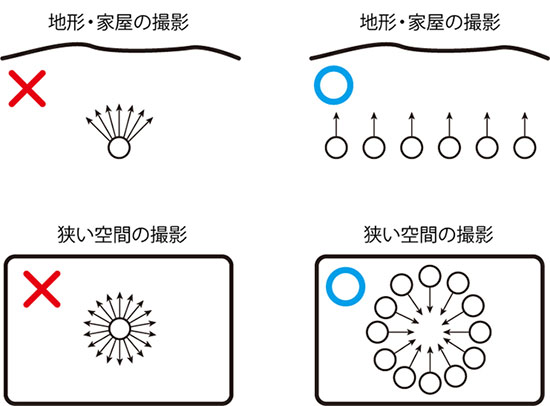
Subject: Open (small objects you bring, people, spaces, landscapes, etc.)
*Classroom 1107 is small, so you may take photos outside. Please be careful not to disturb other classes.
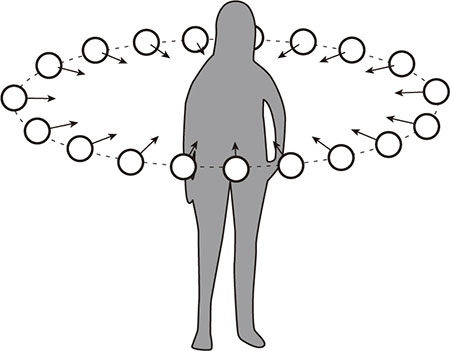
How to Take Photos
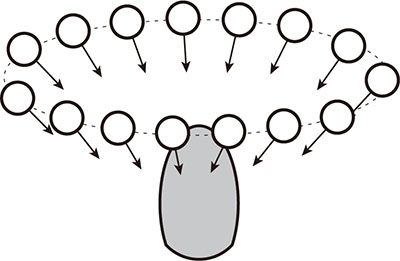
- Take at least 50 photos. This is the minimum number required; taking more photos will improve accuracy.
- Take photos while moving around the subject, keeping it in the center of the frame.
If you want to rotate the object, you will need to mask the background image.
- The image must overlap with adjacent photos by at least 60%.
- Take the photo so that no part of the object is left out of the frame.
- Some items are not suitable for scanning. https://oakcorp.net/agisoft/faq/ (General Q&A > Can I scan anything?)
*Note for iPhone users: Starting with iOS 11, photos are saved in the highly compressed HEIC format. Since photogrammetry software does not support HEIC, please go to Settings > Camera > Format and select “Prioritize Compatibility” (save as JPEG).
Compact Size (Desktop)
Compact Size (Suspended)
Character Size
Space
(Reference URL)
- https://styly.cc/ja/tips/photogrammetry_discont_sample/
- https://oakcorp.net/agisoft/faq/ (How to Use > What should I keep in mind when taking photos?)
Step 2: Importing to a PC
For iPhone
Connect to the iMac using the dedicated USB cable. Import the photos using Photos.
For Android
Download and use Android File Transfer (https://www.android.com/filetransfer/).

If you have an SD card, you can also import files via the SD card. However, please note that the iMac’s SD card slot is standard size.
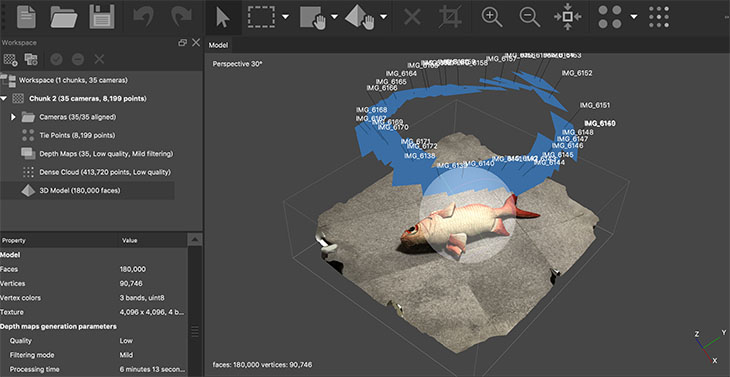
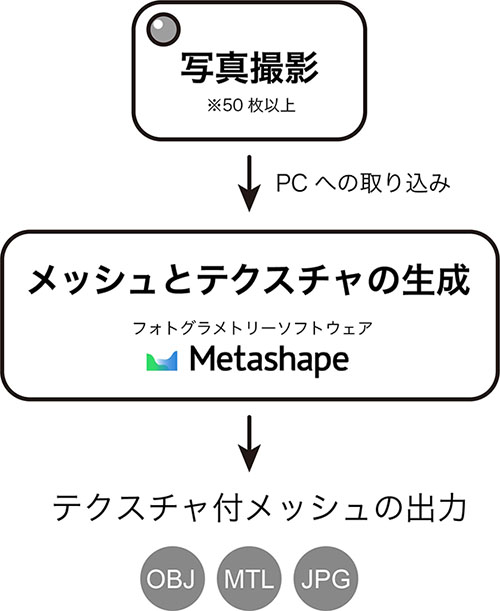
Step 3: Generating and Exporting Meshes and Textures (Metashape)
1. Importing Photos into Metashape
Drag and drop the photo data into the Chunk.
② Photo Alignment (Analysis of photo position and orientation, generation of low-density point clouds)
Workflow Menu > Align Photos
- Setting the processing area (bounding box)
3. Generating High-Density Point Clouds
Workflow Menu > Build Dense Cloud
4. Generating a Mesh (3D Geometry Data)
Workflow Menu > Build Mesh
⑤ Generating Textures
Workflow Menu > Build Texture
⑥ Exporting Mesh Data with Textures
Since Metashape in demo mode cannot generate output, you must activate the trial version before proceeding.
File menu > Export > Export Model (You can also export textures at the same time)
Step 4: Submission of Output Data
Organize the output data (obj, mtl, jpg) into a folder labeled with your student ID and name, and upload it to the Report server.
Official Metashape Tutorial
https://oakcorp.net/agisoft/try/
Importing and Displaying in Blender
Click here for a guide to the basics of Blender.
In progress
Uploading to Styly (Styly Web Editor or Unity)
In progress
STYLY Photogrammetry Award 2019
https://styly.cc/ja/awards/styly-photogrammetry-award-2019/