Arduino + ECM
Updated: 2026-05

This article was written before 2020. It is kept here as an archive — the content is outdated and some links may no longer work.
Various LED Candles
There are many products on the market that use LEDs and electronic circuits to create lighting effects that mimic the flickering of a candle flame. They range from items sold at 100-yen shops to those costing several thousand yen. Many of these products also feature playful, interactive elements, such as ones that go out when you blow on them.
What is ECM?
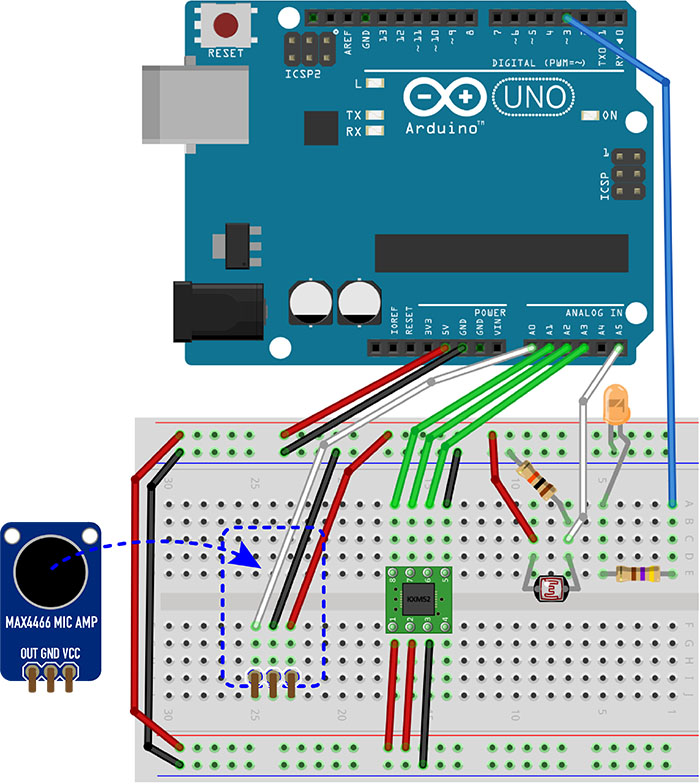
While the principle behind an LED candle that goes out when you blow on it could involve circuits using wind or humidity sensors, this exercise uses an ECM (Electret Condenser Microphone), the same type found in LED candles sold at 100-yen shops.An ECM converts air vibrations caused by sound into electrical signals through changes in capacitance and is used in various types of microphones (condenser microphones). Here, we will use it to detect the “whoosh” sound made when blowing on the candle. Since the signal from an ECM is weak, it must be amplified by an amplifier circuit before being input into the Arduino. In this exercise, we will use a microphone amplifier module based on the MAX4466 (see figure below).

ECM Implementation
Components Used
・ECM amplifier module (MAX4466)
・Jumper wires: 1 red, 1 black, 1 white
Circuit Diagram

Schematic
Install the ECM amplifier module at the position indicated by the blue dotted line.
LED Candle Using ECM and an Accelerometer
1. Preparing the Arduino Sketch
Create a new sketch, copy and paste the code below, and save the sketch.
// LED Candle
// December 2017, Nakayasu

int led = 3;          // LED pin
int brightness = 0;   // Variable for LED PWM value
int sensorValue[4];   // 3-axis accelerometer, ECM
int ledStatus = 0;    // For toggling the LED on/off
int counter = 0;      // Interval counter to ignore hand tremors

void setup()
{
    pinMode(led, OUTPUT);
    for(int k=0; k<4; k++) sensorValue[k] = 0; // Initialize the array
}

void loop()
{
    // Read analog values
    sensorValue[0] = analogRead(0); // A0 connected to ECM
    delay(10); // Allow time for conversion
    sensorValue[1] = analogRead(1); // A1 connected to Z (pin 7) on KXM52-1050
    delay(10);
    sensorValue[2] = analogRead(2); // A2 connected to Y (pin 6) on KXM52-1050
    delay(10);
    sensorValue[3] = analogRead(3); // A3 connected to X (pin 6) on KXM52-1050
    delay(10);

    // Convert the 10-bit sensor value (0–1023) to an 8-bit LED PWM control value (0–255)
    // Use the Z-axis acceleration directly to modulate the LED
    brightness = map(sensorValue[1], 1000, 1023, 0, 255);

    if(counter > 22) {
      if(sensorValue[2] < 420 || sensorValue[3] < 420 || sensorValue[0] < 80) {
        // Turn the LED on or off when the acceleration in the X or Y direction exceeds the threshold, or when the ECM input exceeds the threshold
        //The default values of 420 and 80 were determined through experimentation; increasing these numbers improves sensitivity.
        ledStatus = !ledStatus;
        counter = 0;
      }
    } else {
      counter++;
    }

    if (ledStatus == 1) analogWrite(led, brightness); else analogWrite(led, 0);
}
Download Sketch Data
Arduino_6-4_LedCandle_Arduino.zip (Currently unavailable)
2. Uploading the Arduino Sketch
Compile and upload the sketch.
3. Functionality Test
The LED lights up when you shake the acrylic board in the XY direction or blow on the ECM. It turns off when you shake it in the XY direction again or blow on it once more. The LED is programmed to respond to movement in the Z direction, so it flashes most gently when you do not touch it. If you try to lift it, the brightness fluctuates more intensely in response to the increased movement in the Z direction.
Furthermore, to achieve a higher level of refinement, you can use a battery-powered compact Arduino—such as the Arduino Pro Mini or 8pino—to house the circuit inside the artwork itself. By using full-color LEDs, you could make the light resemble the color of a real candle or even have the color change depending on how the candle flickers.